bcmom's kitchen

bcmom's kitchen
Showing posts with label beef. Show all posts

Friday, September 7, 2018

Pressure Cooker Mongolian Beef

I love my pressure cooker. It makes everything so easy! OK, I don't do everything in the pressure cooker; there are still things that just need to be cooked on the stove or in the oven, but I certainly do use it a lot. This is one of our favorite recipes. The flavors are so good!


Pressure Cooker Mongolian Beef
adapted from Pressure Cooking Today

Ingredients:
  • 1 pound steak, cut into 1/4″ strips
  • 2 cloves garlic, minced or pressed
  • 1/2 cup brown sugar
  • 1/2 tsp minced fresh ginger
  • 1/2 cup soy sauce
  • 1/2 cup water
  • 1 broccoli crown, cut small
  • 1 carrot, cut into *matchsticks
  • 1 red pepper, cut into strips or squares
  • 2 T cornstarch
  • 3 T water
  • 3 green onions, sliced into 1-inch pieces
Directions:
  1. Season beef with salt and pepper. 
  2. Mix brown sugar, ginger, garlic, soy sauce, and water. in PC.  Add beef; marinate for 30 minutes or longer.
  3. When ready to cook, place insert in PC and cook for 13 minutes. Allow pressure to release naturally.
  4. Once pressure has released, remove lid and set PC to Sear. Add vegetables and cook for 2 to 3 minutes. Mix water and cornstarch and add to PC; cook until thickened and bubbly.
  5. Turn PC off and stir in green onions. Serve with rice.

Optional: add a pinch of red pepper flakes. You can also add some sliced onions if you're like me and can't cook without onions. I really think some snow peas would be good in this, though I haven't tried it that way yet. Tonight was the first time I used the red pepper, and it was really good - so I'm officially adding that to the recipe. Of course, if you don't have a red pepper, feel free to leave it out. Add a bit more broccoli; add an extra carrot. I think it can be pretty flexible.

Also, I never actually pay attention to how much steak I have, or even what kind it is. I just grab whatever I have in the freezer. The PC makes it all good and flavorful and tender.


And, since there are just the two of us, we have enough leftovers to have this again in a few days. I warm the leftovers up in the pressure cooker, too, and they taste just as good as the first time. Or maybe better.

*there are different ways of cutting carrots into matchsticks, but I use the method described on this page. I guess I didn't come up with that all on my own... It's really quite easy, and they just seem like the right carrots for this recipe.

Sunday, January 8, 2017

Beef and Cabbage Stir Fry

I found this recipe the other day on Pinterest. I'm pretty sure this is going to become a regular around here. Well, as regular as any recipe can be - there are just so many recipes out there that simply must be tried. That doesn't leave much time for repeats... But, seriously, the flavors in this are so good.


Beef and Cabbage Stir Fry
from BudgetByte$

Ingredients:
  • Sauce
    * 2 T soy sauce
    * 1 T sesame oil
    * 1 T sriracha
    * 1-1/2 tsp brown sugar
  • Stir Fry
    * 1/2 head green cabbage
    * 2 carrots, cut into matchsticks
    * 3 green onions
    * 2 cloves garlic
    * 1 T fresh grated ginger
    *1/2 lb. lean ground beef (or ground turkey or chicken)
    * Pinch of salt and pepper
Directions:
  1. In a small bowl stir together the soy sauce, sesame oil, sriracha, and brown sugar. Set aside.
  2. Prepare vegetables so they are ready to go when you need them. Cut cabbage in half, remove the core, and then shred the leaves of one half the cabbage. Peel two carrots and cut into matchsticks (OR use a cheese grater to shred them). Slice the green onions. Mince two cloves of garlic. Peel a knob of ginger using either a vegetable peeler or by scraping with the side of a spoon, then grate it using a small-holed cheese grater.
  3. Heat a large skillet over medium heat. Once hot, add the ground beef, garlic, ginger, and a pinch of salt and pepper. Cook the beef until browned (about five minutes).
  4. Add the cabbage and carrots to the skillet and continue to stir and cook until the cabbage is slightly wilted (or fully wilted, if you prefer). Stir in your prepared sauce and the green onions; heat through.
  5. Serve with steamed rice, a sprinkle of sesame seeds, some chow mein noodles, and a drizzle of sriracha, as desired.
Note: this makes a medium spicy stir-fry, so if you're sensitive to heat, start with 1 tsp. sriracha and adjust as necessary. Pass the sriracha for those who like a little heat.

I love spicy, so I used the entire tablespoon of sriracha in the sauce, and I thought it was nicely flavorful but not really spicy at all. My husband said it was a bit spicy for his taste, but he loved the way all the flavors went together, and he ate it anyway. Next time I think I'll cut the sriracha down a bit for him and just drizzle a bit on top of mine. Or add some of this hot chili oil.

Also, as it's a stir fry, any other vegetables you have on hand and want to use can surely be thrown in. The more vegetables the better, right?

Friday, November 11, 2016

Easy Pepper Steak

The bell peppers in my garden did really well this year.  It's finally supposed to freeze tonight, so I pulled the rest of the peppers out of the garden this week.  So now I need to use peppers for everything!

So when I picked up some marked down steaks at the store - don't ask me what kind; I don't remember - I figured pepper steak would be just the thing.  Easy pepper steak is even better.


Easy Pepper Steak
adapted from Gimme Some Oven

Ingredients:
  • Marinade:
    * 1/4 cup soy sauce
    * 1/3 cup water
    * 2 T  white wine vinegar
    * 1 T corn starch
    * 1/4 tsp. black pepper
    * 1/4 tsp. ground ginger
  • 1 lb. thinly sliced steak, cut diagonally across the grain into thin strips
  • olive oil
  • 2 bell peppers, thinly sliced
  • 1 medium onion, sliced
  • 2 garlic cloves, minced
Directions:
  1. Mix all marinade ingredients in medium bowl. Add the sliced steak and toss to coat. Cover and refrigerate for at least 15 minutes.
  2. Heat large pan over medium high heat; add a little olive oil. Remove steak from the marinade with a slotted spoon (reserving the marinade) and saute about 2-3 minutes until browned, stirring occasionally.
  3. Add onions, peppers, and garlic; saute until onions start to soften (about 3 minutes), stirring occasionally.  Add reserved marinade and cook for a minute or two, until thickened.
  4. Serve immediately with rice.

This really is an easy recipe.  I changed it up a little and just cooked everything together.  Who has time for cooking the vegetables, removing them from the pan, and then cooking the meat - only to put everything back into the same pan in the end?  Not me!  OK, maybe it would make a difference, and maybe some day I'll try it just to see.  Maybe.


I will definitely be making this again.  Next time I think I'll add a few more veggies.  You can never have too many veggies!  I'd especially like to add a bit more color, but the peppers were what I had, and the peppers were all green.  Next time maybe some red.  And some carrots for the orange.  And... whatever veggies happen to be in the fridge.  Isn't that how it's supposed to work?


Friday, June 10, 2016

Slow Cooker Pepperoncini Beef

I'm in the middle of planning dinner menus and shopping lists - and trying to figure out how it's all going to get done - for a week-long camp that is coming up very very soon.  Thankfully I do have help, and it will get done - and we are going to feed a lot of hungry people!

Somewhere in the search, I came across this recipe.  The person who mentioned it said these sandwiches were fantastic and 'could not be easier' and they sounded like exactly the sort of thing I was looking for.  But, of course, I needed to try them first, right?  Right.  So we had these sandwiches for dinner tonight, and they really are fantastic.  Of course, I didn't exactly follow the recipe because what would be the fun in that? (I'm guessing that the original recipe is really good; I just thought I'd add a couple things)


Slow Cooker Pepperoncini Beef
adapted from A Year of Slow Cooking

Ingredients:
  • 2-3 lb. Chuck roast
  • 1 T onion soup mix
  • 1 cup pepperoncini juice
  • 1 cup beef broth
  • 10-12 pepperoncini peppers 
  • sliced Provolone cheese
  • crusty bread, rolls or buns
Directions:
  1. Place roast in the bottom of crock pot
  2. Sprinkle with onion soup mix; pour pepperoncini juice and broth into crock pot and add pepperoncinis.
  3. Cover and cook on low for 8 hours.
  4. Shred beef with two forks and stir.  Serve on bread, rolls, or buns with a slice of cheese.

The original recipe called for just pouring a 16-oz. jar of pepperoncini over the roast - that's it, just a roast and a jar of pepperoncini.  So I complicated it a bit by adding the onion soup mix and beef broth, but this recipe is still super simple.  Also, I'm not sure how many peppers and how much juice is in a 16-oz. jar, because I buy them by the gallon ($6.99 at GFS!).  So I just guessed.

This ended up quite juicy, but that's OK because you want some of that oh-so-tasty broth along with your beef because it soaks into the bread and comes pretty close to absolute perfection.  Messy perfection, but perfection nonetheless.  Just be sure to have some napkins handy, and hold over your plate.


For those worried that this might be a bit spicy, it really isn't.  There's a nice tang to it, but it's really not spicy.  Of course those who like a little spice will want one (or two) of the warm pepperoncinis on their sandwiches.  (it doesn't really add much heat, but the flavor is great)  I would recommend removing the peppers before shredding the beef - which I did not do.  Otherwise you will end up shredding some of the peppers too, and then it's really hard to serve up a sandwich without some pieces of pepperoncini in it.  Also, you'll end up with random stems floating around that nobody wants to eat.

We had a nice garden salad to go along with our sandwiches.  Did I mention that I'm getting lettuce, lettuce, and more lettuce out of my garden?  My husband skipped the salad and just had another sandwich.  I had more salad - but then I couldn't help snitching a few pieces of this beef as I cleaned up the kitchen after dinner.  So good!  I'd definitely recommend this recipe.  So much flavor with so little work - I think we have a winner. 

Tuesday, January 20, 2015

Pasta e Fagioli

We've always loved Olive Garden's Paste e Fagioli Soup, and it was a happy day when my friend Peggy found a copycat recipe that tastes almost exactly like Olive Garden's. I have modified it slightly by only using 1/2 lb. ground beef, cutting the pasta way down, and adding a bit more liquid.


Pasta e Fagioli
adapted from Top Secret Recipes

Ingredients:
  • 1/2 lb. ground beef
  • 1 small onion, diced (1 cup)
  • 2 cloves garlic, minced
  • 1 large carrot, julienned (1 cup)
  • 3 stalks celery, chopped (1 cup)
  • 2 14.5-ounce cans diced tomatoes
  • 1 15-oz. can kidney beans, drained
  • 1 15-oz. can great northern beans, drained
  • 1 15-oz. can tomato sauce
  • 1 12-oz. can V-8 juice (OR 1 8-oz. can tomato sauce and 1 can vegetable broth)
  • 1-1/2 tsp. salt
  • 1 tsp. oregano
  • 1 tsp. basil
  • 1/2 tsp. thyme
  • 1/2 tsp. pepper
  • 1 T white vinegar
  • 1 cup water (use it to rinse tomato and tomato sauce cans and then add to pot)
  • 1/2 cup ditali pasta
Directions:
  1. Begin browning ground beef in 6-quart pan over medium heat. 
  2. Add onion, garlic, carrot, and celery and continue cooking until beef is browned. Drain fat if necessary.
  3. Add all remaining ingredients, except pasta; cover and simmer for 1 hour, stirring occasionally.
  4. Cook pasta in boiling water over high heat, just until it is al dente.  Drain.
  5. Add pasta to soup pot; simmer for 5 to 10 minutes and serve

In the past I have used the V8 that the recipe calls for, but V8 is not something that I usually buy or have on hand.   So, this last time I made it I substituted a can of vegetable broth and an additional 8-oz. can of tomato sauce, and it turned out great.  I also didn't have the exact pasta so I used Creamette Rings instead.


I warmed this up several times - yay for leftovers! - and added a bit of water each time, just to keep the consistency right.  Some soups I love as they get thicker and thicker each time they're reheated, but I'd rather not let this one thicken up too much.  This is also a good reason not to use too much pasta.  The original recipe called for 8 oz. of pasta, and that is fine the first day, but as the soup sits the pasta soaks up the liquid, and pretty soon you have something more like goulash.

If you like the Paste e Fagioli Soup from Olive Garden, you'll definitely want to give this recipe a try.  So yummy!  Sprinkle with some Parmesan, serve with some crusty bread, and enjoy.

Thursday, July 17, 2014

Italian Beef and Zucchini Stir Fry

I'm not sure where I originally found this recipe.  I cut it out of a magazine or something, and it's been in my recipe collection for ages.  Here's a copy of the original recipe I found over on Food.com.

Of course, I didn't follow the recipe, exactly, but I think that's part of the appeal of a recipe like this - you can substitute the ingredients you have on hand.  I didn't have any cherry tomatoes, but I did have one Roma - and a red pepper for some color.  I also added some sliced onion, because everything needs onions!


Italian Beef and Zucchini Stir Fry

Ingredients:
  • 8 oz. spaghetti
  • 1 tablespoon oil
  • 8 oz. thinly sliced beef
  • 2 garlic cloves, minced
  • 1/2 a medium onion, sliced
  • 1 red bell pepper, sliced
  • 2 small to medium zucchini, sliced thin
  • 1/4 cup Italian dressing
  • 1 Roma tomato, diced
  • Parmesan cheese
Directions:
  1. Cook spaghetti according to package directions.
  2. While spaghetti is cooking, heat oil in skillet; add beef and stir fry until partially cooked, 2-3 minutes.  Add garlic, onion, and bell pepper and stir fry another couple minutes before adding zucchini.
  3. When zucchini is crisp tender, season with salt and pepper and then add Italian dressing and diced tomato.  Heat through.
  4. When spaghetti is cooked, add a ladle of the cooking water to skillet and set aside a little more (1/2 cup to a cup)  Drain spaghetti and add it to the skillet; mix it in and heat for a couple minutes to let everything combine.
  5. Serve with Parmesan cheese.

I used whole wheat spaghetti, which was just perfect in this, but you can use regular spaghetti too.  A green bell pepper will work in this, too if that's what you have.  It's a simple recipe with a lot of flavor, and you can adjust it to suit your tastes or to use the items you have in your kitchen.


Even the leftovers are good!  This is where the reserved pasta sauce comes in - add it to your leftovers before refrigerating them.  Pasta tends to soak up extra moisture.  If you don't add the pasta water now, you will find you need to add water when you reheat, so you might as well use the good pasta water.

I've heard that there are people who won't eat leftovers, but if you liked it the first time, wouldn't you like it a couple days later?  Sometimes it's even better reheated because the flavors have had time to blend and improve.  But that's another topic.  Just try this recipe.  You'll like it.  Oh, and if you have lots of zucchini you're trying to figure out what to do with, try this first and then pass the rest to me.  I actually had to buy the zucchini I used in this recipe because I don't have a garden again this year, which makes me very sad.   Hard to believe when I was growing up I said I didn't want to have a garden when I grew up!

Friday, March 28, 2014

A Couple of Pizzas

I made a couple pizzas for dinner this week.  They both turned out pretty good!


 And we have a whole pizza - some pieces from each - left over for another meal!  Here are the toppings for both pizzas.  No measurements really, because pizza is just like that.  You pile on the toppings until it looks right to you.

Barbecue Chicken Pizza
  • Barbecue sauce
  • 1 boneless chicken thigh, grilled
  • Sliced onion
  • Sliced mushrooms
  • Cheese - Mozzarella and Cheddar
Roast Beef Pizza
  • Garlic Ranch Sauce - Ranch dressing mixed with minced garlic
  • Parmesan cheese
  • Leftover roast beef, cut into bite-sized pieces
  • Sliced onion
  • Sliced mushrooms
  • Asparagus pieces
  • Cheese - Mozzarella and Cheddar, crumbled Queso Fresco
  1. Spread sauce on crust, sprinkle Parmesan on the Garlic Ranch sauce.  Add toppings and cheese. 
  2. Bake pizzas at 450° F for 15 minutes or until crust is done and cheese is melted and browned.  
  3. Remove from oven and let sit for at least 5 minutes before cutting.

I am still trying to find the perfect Pizza crust recipe or technique or whatever the secret is to that perfect crust.  This one wasn't too bad, but there's definitely room for improvement.  The toppings, on the other hand, were very yummy!

Wednesday, March 13, 2013

Beef Noodle Bowl

I found this recipe in one of my old Food & Family magazines from Kraft.  My biggest question is - "Why haven't I made this before?"  Since I found the recipe, I've made it twice with beef and once with chicken.  This is going to be a regular recipe around here. 


This is really easy and tastes really good. It is best with steak and fresh vegetables, but I used boneless chicken thighs and frozen broccoli once, and that was pretty good, too.  You could probably adapt the recipe to use whatever vegetables you have or want to use - though carrots and broccoli are pretty much perfect. 
with chicken

I always set a bit of the pasta water aside to add to any leftovers - whatever looks good - because pasta tends to absorb liquid when it sits, and a little extra is welcome when it's time to heat it back up.  Of course, last time I made it, my husband was here, and there weren't any leftovers.  I guess he likes it too!


I really like to sprinkle a few red pepper flakes on top and cilantro if I have it.  The Kraft recipe says to sprinkle with dry roasted peanuts, which I haven't tried, but it does sound good - so maybe next time.

Monday, February 25, 2013

Crock Pot Beef Carnitas Tacos

I found this recipe on Pinterest, and so far I've made it twice.  In the last couple of weeks.  It's that good!


Not only is it good, but it's so easy to make.  All you do is mix spices together - chili powder, cumin, garlic powder, salt, pepper, etc. - and rub them on a flank steak.  Place the steak in the bottom of your crock pot, put chopped onion, bell pepper, and jalapeno on top, and cook it for 8 hours.  After 8 hours, you take the steak out, shred it with two forks, and return it to the crockpot.  You can either serve it then or keep it warm in the crock pot until you're ready to eat.  Serve with corn tortillas, salsa, avocado, cilantro and lime. 


You can prepare this the day before - rub the spices on the steak, chop the onion and peppers, and throw everything into the crock pot.  Then it's easy to just pull it out of the fridge the next morning and start it cooking.  Another option is to prepare everything, let it cook overnight, and then it's ready to shred when you get up in the morning.  Also, your house will smell amazing when you get up.


The meat is seasoned so nicely and is even good cold, but the leftovers also heat up nicely.  I put enough meat for two tacos into one half of a large skillet and two corn tortillas in the other side and heat on medium heat until the meat is warmed through and the tortillas are warm.

The first time I made this, I followed the recipe, using 1 green pepper, 1 red pepper, and 1 jalapeno.  The second time I just pulled some diced green peppers out of the fridge and didn't worry about the red one.  I don't even know how many peppers I had diced - just put the onion, frozen green peppers, several pieces of frozen hot peppers, and a clove of garlic into my food processor and chopped them up good.  It turned out really good. 

Wednesday, July 4, 2012

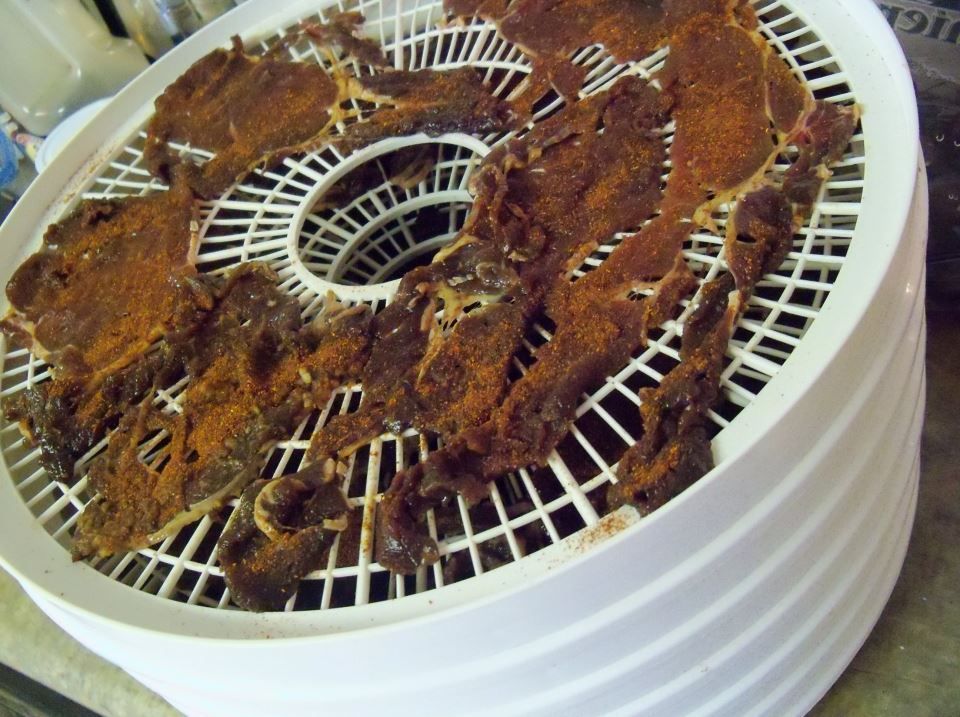
Beef Jerky

One of my friends posted this picture on facebook and said that she's starting a batch of beef jerky.  Why have I not tried this before?  We love beef jerky.  So, of course I asked what she marinates it in and how long it takes. (I've pretty much only used the dehydrator to dry apples so far - which are really good, and I need to do some more)

Here's her recipe:


Beef Jerky

  • Marinate 1 lb. thin sliced ribeye in 1/2 C soy sauce, 1 tsp liquid smoke, 1 tsp onion juice,1 tsp chopped garlic, 1 tsp salt. 
  • Shake on cayenne pepper when you put it in the dehydrator. 

It can take anywhere between 4 -12 hours to dry depending on your dehydrator and how many layers you put it in. Drying it overnight works well.

And some other recipes to look at and try:

Dehydrator Beef Jerky - recipes and instructions.
Enhanced by Zemanta

Thursday, March 31, 2011

Salisbury Steak

It was always special when my mom made Salisbury Steak. So yummy!

Salisbury Steak

for patties:
  • 1-1/2 lb. ground beef
  • 1 med. onion, chopped
  • 1/2 tsp. salt
  • 1 cup oatmeal
  • 1 cup cracker crumbs
  • 1-8 oz. can tomato sauce
  • 2 eggs
  • 1 tsp. chili powder
Mix well, and form into patties.  For uniform patties, I use a 1/3 cup measuring cup - fill measuring cup with meat mixture, then form into patty.  Brown patties in skillet (both sides) and place in a 13x9 inch baking dish.

for gravy:
  • 2 cups beef broth
  • 1 T. cornstarch
  • 1 tsp. Worcestershire sauce
  • 2 cans cream of mushroom soup
Mix gravy ingredients well using wire whisk. 
Pour gravy over patties in baking dish.  Bake @ 350° for 45 minutes.

Serve with mashed potatoes and a vegetable.

Enjoy!
 

Step by step directions with pictures - created on Tabblo.

Tuesday, November 16, 2010

Peasant's Offering

Another recipe from my favorite cookbook, The Best of Mennonite Fellowship Meals.

Peasant's Offering

Ingredients:
  • 2 T cooking oil
  • 1 medium onion, diced
  • 1 lb. lean ground beef (or turkey)
  • 1 medium head cabbage, grated
  • 2-1/2 tsp. salt
  • 1/2 tsp. black pepper
  • 1 tsp. paprika
  • 1 cup sour cream
  • 5-6 large potatoes
  • 1 cup milk or less
  • 1 T butter
  • Chopped parsley or chives
Directions:
  1. Heat cooking oil in very large skillet. Add onion and saute lightly. Add ground beef and stir to keep meat loose and fine. cook just until pink disappears.
  2. Gradually add grated cabbage, stirring until all cabbage is well cooked. Add seasonings adjusting to taste. Remove from heat.
  3. Stir in sour cream. Spoon into rectangular baking dish (13X9) and spread evenly over bottom. Keep hot in oven.
  4. Dice and cook potatoes. Mash with milk and butter until desired consistency. Layer mashed potatoes over cabbage mixture.
  5. Garnish with chopped parsley or chives and serve.

This is always really popular at potlucks. I usually spoon the meat and cabbage mixture into my crockpot, layer the mashed potatoes on top, and turn it on low to keep it warm. If I'm fixing this at home, I usually just leave the meat and cabbage mixture in the skillet and put that in the oven to keep it warm. Then layer the mashed potatoes on top and serve. I usually completely forget about the parsley or chives, but I figure they're more for looks than anything - and no one seems to care.

Tuesday, October 19, 2010

Using My Garden Produce

I had some beautiful red peppers from my garden this year. Adding them to my zucchini was not only yummy, but pretty, too!

  • Saute sliced onion and sliced red pepper in olive oil. 
  • Add sliced zucchini and cook until done.  
  • Season with salt and pepper to taste. 
The next day I was looking for something for lunch, had a bit of the zucchini left, some roast beef that needed used, and some chard from the garden...


With the leftovers:
  • Cook sliced chard (7 leaves or so) in olive oil until done.  Season with salt and pepper. 
  • Slice roast beef and add to skillet; heat through. 
  • Add zucchini mixture and cook until heated, stirring frequently. 
  • Sprinkle with feta cheese.
Yum! 

I tried making the zucchini, chard and roast beef for dinner one night by slicing uncooked beef and cooking that in olive oil with the onion and pepper then adding the zucchini and chard - but I didn't like it as well.  The peppers and onions didn't cook the same way or something.

I've still got chard in the garden, but everything else is finished, so I'll have to wait until next summer to make this again.  Posting this now so I don't forget!

  © Blogger template 'Totally Lost' by Ourblogtemplates.com 2008 - Header credit: Steve Wampler

Back to TOP