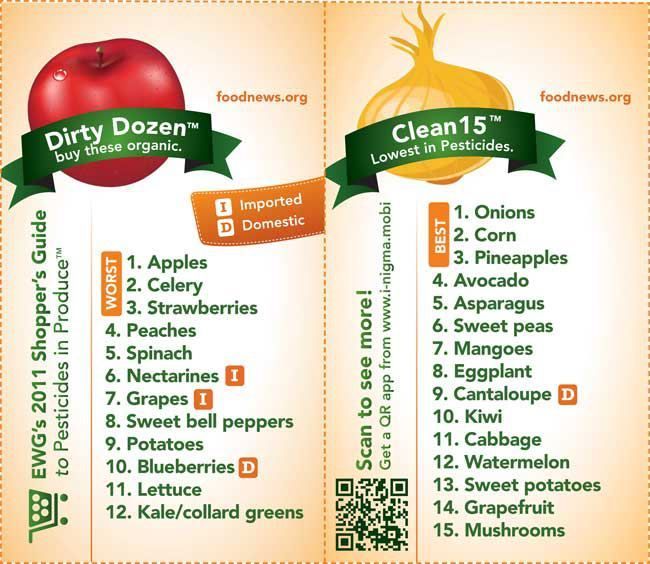
bcmom's kitchen

bcmom's kitchen

Wednesday, December 5, 2012

Ricki's Spicy Slaw


My friend Ricki shared this recipe on facebook - and he just kept talking about it.  It seemed that he was making this stuff all the time and eating it just as quickly as he could make it.  Of course I had to try it, right?  I'm so glad I did.  This stuff is amazing!  I've made it several times so far...

Ricki's Spicy Slaw

Ingredients:
  • 1/2 medium head of Green Cabbage, chopped
  • 1/2 cup fresh Cilantro, finely chopped
  • 1 large Tomato, finely chopped
  • 1/2 cup Red Onion, finely chopped
  • 3 Green Onions, finely chopped
  • 1/2 cup of Claussen Kosher Dill Pickle juice
  • 1.5 Claussen Kosher Dill Pickles, finely chopped
  • 2 - 4 Pickled Pepperoncinis, finely chopped
  • 1/4 cup of Ranch Dressing
  • 1 tsp Apple Cider Vinegar
  • 1 Tbsp Garlic Salt
  • 1 tsp Onion Powder
  • 2 dashes (or more, to taste/burn) Cayenne Powder
  • 1 - 2 Serrano Peppers, finely chopped
  • 1/2 tsp Crushed Red Pepper
Directions:
  1.  Mix all ingredients in large mixing bowl
  2. After mixing thoroughly, let it sit for an hour or so (if you can!) and let the flavors blend.  Then mix it again, each time, before eating.

So many great flavors all blended together!

A few notes: I've never measured the cilantro; just washed and chopped up a bunch.  I used regular, ordinary, yellow onion, and I used the dill pickles I had on hand, in my case Vlasic, and I'm not sure if it is supposed to be 1.5 pickle spears or 1.5 whole dills - so I just used 1 really big whole dill pickle each time.  I, of course, used 2 peppers each time (sometimes jalapenos because that's what I had) and 4 Pepperoncinis.  Even with those the slaw isn't overly spicy, just very nice and flavorful.


With all the ingredients and chopping involved, I supposed you could use a food processor, but I love my knife and cutting board, so I just chop everything that way.  It really doesn't take too long, and you get to enjoy all the lovely aromas as you do it!

Did I say that I really love this stuff?  No wonder Ricki was making it and talking about it so much.  Try it - you'll talk too!
Enhanced by Zemanta

Tuesday, November 27, 2012

How to Cook Your Holiday Dinner without an Oven

Two days before Thanksgiving my oven quit.  Definitely not good timing - as if any time is a good time for the oven to quit.

I had plans for Wednesday, plans that involved lots of baking.  I was going to cook the turkey in my roaster oven while I used the oven to bake pies and rolls.  Without a working oven, those plans changed.  Thankfully I had already baked a pie on Tuesday afternoon, before the oven quit, so I only had two more to bake.  And the rolls, and - well, the oven plays a very important part in fixing any big family dinner.  How do you cook everything without an oven?


Use the roaster oven!  Yep, that's right, those pies and rolls can be baked in the roaster oven.  It's not just for turkeys and big pots of chili.  Preheat the roaster with the rack, then place the unbaked pie on the rack and bake.  Do not remove the lid to check it, because that will let the heat out - at least until the designated baking time is up.  I found that my pies needed more time in the roaster than in the regular oven, so next time I will just bake them longer before I check on them. 

German Chocolate Pie
You may also need to adjust your baking times, but try the regular recipe time first.  An advantage to knowing you can bake in your roaster oven?  You can use it in the summer time when you want to bake, and you don't want to heat up your whole kitchen!

I baked my pies and my turkey in the roaster oven.  It took longer because I couldn't do it all at the same time - one pie at a time and then the turkey - but I did get it done.  Instead of baking the rolls on Wednesday like I'd planned, I mixed them up and formed them into rolls after letting them raise the first time, and then I covered them and refrigerated them overnight.  The next day I pulled them out of the fridge and let them warm up and raise (about 1-1/2 hours), and then I baked them in the roaster oven.


Use crock pots!  Another option for cooking that holiday dinner without an oven is to use crock pots - in addition to the roaster oven.  I bought a triple crock pot last year, and that thing really came in handy.  I mixed up my dressing, and instead of baking it in the oven like I would normally have done, I greased a crock pot (actually I needed 2 of them), spooned the uncooked dressing in, and cooked it on high for about 4 hours.  It turned out great.  Same thing with my sweet potatoes.  I boiled them first, then peeled and sliced them, and layered them into another greased crock with a butter and brown sugar syrup.  Again, normally I would have put the sweet potatoes into a casserole dish and baked them, but they turned out just fine in the crock pot.  Yummy!

The mashed potatoes were, of course, boiled on top of the stove, and I made the gravy on the stove, too - as usual.  I warmed the turkey in the roaster oven the same way I would have done it in the oven - put some of the sliced turkey in a 13x9 cake pan, add some broth to keep it moist, cover with foil.  The hardest part was getting the pan of turkey out of the roaster oven without burning myself when it was time to eat, but I managed.

Yes, it would have been easier to cook Thanksgiving dinner if I'd had the use of my oven, but everything still turned out great.  It just took a little extra planning and time.
Enhanced by Zemanta

Monday, November 19, 2012

Cornbread - Sweet or Not?

I usually just use the cornbread recipe in my cookbook, and it's not bad, but the other day I went searching online for a 'buttermilk' cornbread recipe, because I had some soured milk I wanted to use.  I used some for waffles, and I needed a recipe to use the rest.

I found this recipe - I used a bit less sugar and used whole wheat flour, also didn't follow the original directions, because this made more sense to me.

Grandmother's Buttermilk Cornbread

Ingredients:
  • 1/2 cup butter
  • 2 eggs
  • 1 cup buttermilk (or soured milk)
  • 1 cup cornmeal
  • 1 cup flour (I used whole wheat)
  • 1/2 cup white sugar
  • 1/2 teaspoon baking soda
  • 1/2 teaspoon salt
Directions:
  1. Place butter in 9 or 10-inch cast iron skillet and put the skillet into the oven.  Preheat oven, with skillet, to 375°
  2. In medium bowl, lightly beat eggs; stir in sugar and buttermilk
  3. Measure cornmeal, flour, baking soda, and salt into bowl; Using measuring spoon, lightly mix dry ingredients together without mixing them into the liquid ingredients, then mix the dry ingredients into the liquid until well blended
  4. Remove skillet from oven and mix melted butter into batter
  5. Pour batter into the hot buttered skillet; bake in the preheated oven for 30 to 40 minutes, or until a toothpick inserted in the center comes out clean.

My husband said he liked this cornbread better than the usual cornbread, so I definitely need to keep this recipe.

Tonight I thought I'd try something a bit different and made this Southern Cornbread recipe.

Southern Cornbread

Ingredients:
  • 6 Tbsp butter
  • 1 egg (optional)
  • 1-1/4 cups buttermilk
  • 2 cups cornmeal OR 1 1/2 cups cornmeal and 1/2 cup flour
  • 2 teaspoons baking soda
  • 1 teaspoon salt
  • 2 Tbsp sugar (optional)
Directions:
  1. Place butter in 9 or 10-inch cast iron skillet and put the skillet into the oven.  Preheat oven, with skillet, to 400°
  2. In medium bowl, lightly beat egg; stir in buttermilk
  3. Measure cornmeal, flour, baking soda, salt and sugar into bowl; Using measuring spoon, lightly mix dry ingredients together without mixing them into the liquid ingredients, then mix the dry ingredients into the liquid until well blended
  4. Remove skillet from oven and mix melted butter into batter
  5. Pour batter into the hot buttered skillet; bake in the preheated oven for 20 minutes, or until a toothpick inserted in the center comes out clean.
  6. Let the bread rest for 10-30 minutes in the skillet before cutting it into wedges and serving

Cornmeal - organic and non-GMO
I used 1-1/2 cups cornmeal and 1/2 cup whole wheat flour.  I also used the egg and the 2 Tablespoons sugar.  I liked it, especially in my soup.  It is definitely not sweet, so I'm sure my husband will still prefer the other recipe.  It's also quite crumbly - good when you're putting it in soup, but not so great if you just want to eat cornbread with butter.  Now, cornbread with butter and molasses that you eat with a fork - it works quite well for that.

How do you like your cornbread?  Sweet or not?
Enhanced by Zemanta

Friday, November 16, 2012

Pizza Crust

This is the pizza crust recipe from the cookbook that came with my first bread machine.

Pizza Crust

Ingredients:
  • 1 cup water
  • 2 T olive oil
  • 1 tsp salt
  • 3 cups flour
  • 2-1/4 tsp. yeast
Directions:
  1. Put all ingredients into bread maker in the order given; use Dough cycle.
  2. When dough is ready, divide in half and let rest for 10 minutes.  Then roll or pat each half into a 12-inch circle on a lightly floured surface.  Place on prepared pizza pans; cover and allow to sit for 10-15 minutes.
  3. Bake each crust in preheated 400° oven 5-10 minutes, or until lightly browned.
  4. Remove from oven and spread with favorite pizza toppings.  return to oven for 10 to 15 minutes or until cheese and toppings are melted and bubbling.

I found this next recipe on Pinterest and used it last time I made pizza, because I couldn't find the bread machine cookbook.  I just used my bread machine with these ingredients.  I liked this one a lot, so I'm trying to compare the two recipes to see what the difference is.  It looks like - more water, more flour, more salt.

Basic Pizza Dough

Ingredients:
  • 1-3/4 cups warm water
  • 2 T olive oil
  • 1½ tsp. salt
  • 4 cups bread flour
  • 2¼ tsp. yeast
 Follow above directions, or click on the recipe name for the original recipe directions and tips.
 

Update: I loved this crust fresh, but froze half of it as suggested in the recipe.  I did like she said, "Freeze the dough until it is ready to be used.   The day you plan to use the dough, transfer it to the refrigerator in the morning to thaw in time for dinner that evening." and, "Before making the pizza, take the dough out of the refrigerator and let stand at room temperature for about 30 minutes to take off the chill." - and it just wasn't very good at all.  Maybe if I get a pizza stone? I really need to get one.  But, for now, as easy as the dough is to make in the bread machine, there's really no reason not to make it fresh - except that I don't always need to make two pizzas.

I've also been experimenting with using my sourdough starter:

Sourdough Pizza Crust

Ingredients:
  • 1cup starter
  • 1/2 cup warm water
  • 1 cup unbleached flour
Mix and allow to sit until active and bubbly.  Then stir in:
  • 1 T olive oil
  • 1/2 tsp. salt
Add to make a soft dough:
  • 1 to 1-1/2 cups unbleached flour
Use additional flour for kneading.

Directions:
  1. After mixing and kneading, let rise 2 hours or until doubled in size.
  2. Punch down and let rest, covered, for 10 minutes.  Then roll or pat each half into a 12-inch circle on a lightly floured surface.  Place on prepared pizza pans; cover and allow to sit for 10-15 minutes.
  3. Bake each crust in preheated 400° oven 5-10 minutes, or until lightly browned.
  4. Remove from oven and spread with favorite pizza toppings.  return to oven for 10 to 15 minutes or until cheese and toppings are melted and bubbling.

Now to figure out which recipe I like best. Right now I'm thinking the middle one - the one I found on Pinterest, but I also like the sourdough recipe. I just have to remember to start in plenty of time for that one, or dinner is late. Like tonight.

Friday, October 19, 2012

Israeli Cucumber and Tomato Salad

I found this recipe in the Food section of my newspaper.  I'm not sure why this is called Israeli salad - they probably told me in the article that the recipe came with, but I didn't read that.  What I do know is that I knew I had to try it the minute I read the recipe.  So many yummy flavors all in one salad!  So far I've made it twice.

Israeli Cucumber and Tomato Salad

Ingredients
  • 1 cucumber, cut into small dice
  • 4 to 5 Roma tomatoes, cut into small dice
  • 1/4 cup finely chopped onion
  • 1/4 cup chopped fresh cilantro
  • 1 avocado, diced
  • Juice of 1 lemon
  • 2 T extra-virgin olive oil
  • Salt and pepper to taste
Directions
  • Place cucumber, tomato, onion, cilantro and avocado in a medium bowl.  Add lemon juice, olive oil and salt & pepper to taste.  Toss gently to combine.
To prepare ahead: You can prepare the salad early in the day.  cover and refrigerate until ready to serve.

Of course, it's salad - so feel free to vary the ingredients to suit your taste - more cucumber, more tomato - more avocado

So yummy.

Monday, September 17, 2012

Jalapeno Poppers

I made these Baked Jalapeno Poppers last year.  They were so good that I planted jalapenos this year just so I could make them again!  (Yes, I know I can buy jalapenos in the store, but I know these are so much better!)

My garden has been pretty pitiful this year, but the jalapenos produced quite well.  I picked a bunch of them today, along with a few sweet peppers, one decent-sized tomato as well as some really little ones, and a small cucumber.  I cut some chard, too, though it's not pictured here.

Then, I got busy making Poppers.  First I mixed cream cheese and Mozzarella with cumin and cayenne.  Then I made bread crumbs by putting a couple slices of bread in the Ninja and then mixed the resulting crumbs with the seasonings in a pie plate.  Then I mixed up the eggs and milk in a small bowl and mixed the seasonings and flour in another pie plate.  And then I cut up some of the peppers.

The original recipe said 12 jalapenos, but I noted that I used more last year, so I started with 18.  Then I started putting the cheese mixture into the jalapeno halves.


After I'd filled all the jalapeno halves, I still had cheese left, so I cut up a few more peppers, for a total of 22.  And I put cheese into those, too.  Then it was time to roll the filled jalapeno halves in the egg mixture, flour, and bread crumbs - first the egg mixture, then the flour, then egg mixture again, then bread crumbs - one hand for wet and one hand for dry.  Even doing it that way, it was messy!

I put the finished poppers on cookie sheets lined with waxed paper.


Then all of the finished jalapeno poppers - except for the three I baked and ate for lunch - went into the freezer.  Once they're frozen, I'll put them all into a container (or containers) and they'll be ready any time I want some yummy Jalapeno Poppers.  Just pull them out of the freezer and bake them for a delicious treat!

That's what I love about these - they're baked, not fried!  Here's the recipe, as I made them today.

Baked Jalapeno Poppers

Ingredients

  • 22 fresh jalapeno peppers, halved lengthwise, stems, seeds and membranes removed
  • 8 ounces cream cheese, softened
  • 2 cups grated Mozzarella cheese
  • 1/2 teaspoon ground cumin
  • 1/2 teaspoon cayenne, or less, to taste
  • 3 large eggs
  • 3 tablespoons milk
  • 6 teaspoons Essence, recipe follows
  • 3 cups breadcrumbs
  • 3/4 cup all-purpose flour
Directions
  1. In a bowl, cream together the cream cheese, Mozarella cheese, cumin, and cayenne.
  2. In a small bowl, beat together the eggs, milk, and 2 teaspoons of the Essence. In a shallow dish, combine the bread crumbs with 2 teaspoons of Essence. In a third dish, combine the flour and 2 teaspoons of Essence. 
  3. Spread cheese mixture into the middle of each jalapeno half. One at a time, dip into the egg mixture, dredge in the flour, dip into the egg mixture, then dredge in the bread crumbs, pressing to coat. Place the coated peppers, cut side up, on lightly greased a baking sheet and bake at 350° F until the filling is runny and the crust is golden, about 30 minutes.  (or place them on a waxed-paper lined cookie sheet and freeze.  Once frozen, layer them in a container with waxed paper between layers.  When ready to use them, remove from freezer and follow directions for baking.)
  4. Remove from the oven and serve immediately with cold beer.  (or milk)
*Essence (Emeril's Creole Seasoning):
  • 2 1/2 tablespoons paprika
  • 2 tablespoons salt
  • 2 tablespoons garlic powder
  • 1 tablespoon black pepper
  • 1 tablespoon onion powder
  • 1 tablespoon cayenne pepper
  • 1 tablespoon dried leaf oregano
  • 1 tablespoon dried thyme
Combine all ingredients thoroughly and store in an airtight jar or container.

Yield: about 2/3 cup

I made the Essence seasoning last year when I made these.  I still had plenty to use this year.  The recipe makes way more than you'll need just for the poppers.

I only used about half the jalapenos I picked today, and there are more, smaller ones still on the plants, so I'll probably be making at least one more batch of these - once I get the cookie sheets cleaned off so I have somewhere to put them.  That ought to give us enough jalapeno poppers to get us through for a month or two!

Friday, August 24, 2012

Crockpot Chicken and Salsa

Copying this from my old recipe blog (it's about time).  I wanted something easy for potluck tomorrow and went looking to find where I'd posted the recipe.

Recipes are kind of like the Pirate Code - more like suggestions than actual rules. Here's the original recipe:


Crockpot chicken with salsa and cheese

Ingredients:
  • 1 can (15 oz) black beans, rinsed and drained
  • 2 cans (15 oz) whole kernel corn, drained
  • 1 cup bottled thick and chunky salsa, your favorite
  • 5 or 6 skinless, boneless chicken breast halves (about 2 lbs)
  • 1 cup shredded Cheddar cheese

Directions:
In a 3-1/2- to 5-quart slow cooker, mix together the black beans, corn, and 1/2 cup of the salsa. Top with the chicken breasts, then pour the remaining 1/2 cup salsa over the chicken. Cover and cook on HIGH for 2-1/2 to 3 hours, or until the chicken is tender and white throughout; do not overcook or the chicken will be dry.

Sprinkle cheese on top; cover and cook until the cheese melts, about 5 to 15 minutes.

Here's how I actually made it, and it turned out very good:
Saute one sliced onion and one clove of garlic in olive oil.  Add 2 chicken breasts, cut up; cook until almost cooked and add 2T taco seasoning.  Add beans, corn, salsa - cook on low for several hours then add cheese.

Serve over rice and with tortilla chips.  Cilantro is very good with this, and sour cream.

Because I wanted this for tomorrow's potluck, I went pretty much with the original recipe, except I used 2 cups frozen corn and added some taco seasoning to the chicken breasts.  Oh, and I tossed some chicken broth on top because I was cooking other stuff and had some extra. So it'll probably be kinda soupy - but I bet it will be good.

My friend Peggy makes something very similar to this all the time.  We call it Crockpot Chicken Ole.  I suppose I could call this the same thing?
Enhanced by Zemanta

Wednesday, August 22, 2012

An Avocado a Day

A friend of mine just posted this on Facebook. 


She said she wishes she could grow avocados in her backyard.  Wouldn't that be nice?  I wish I could grow them in my backyard, too - now that I know how much I love them! (and, of course, how healthy they are)

There  was a time when I really did have avocados growing in my backyard.  And then?  I never ate a single one!  Imagine!  They fell off the tree and either went to waste or were eaten by the dogs.  I guess at least we had healthy dogs, right?  I did eat the lemons from the lemon tree.

Today I eat avocados as often as I can.  Today I had avocado and sprouts on my tuna salad sandwich.  It was so good!  I just wish avocados didn't cost so much in the store.  But then again, considering all the health benefits, I suppose they aren't so expensive after all...

Tuesday, July 17, 2012

Chicken, Spinach and Mushroom Pasta

I know there's a site that lets you enter the ingredients you have in your fridge/pantry to come up with recipes that use those ingredients.  In fact, I think I might have even posted something about it on this blog.   Somewhere.  But I don't use that site - or any site like it.  I just type the ingredients I have, plus the word 'recipe' into search in my browser, and I end up with a whole list of recipes to choose from.

Yesterday I typed in 'chicken spinach mushroom recipe' - because I had cooked chicken, spinach, and mushrooms in the fridge that needed used, of course -  and found this one from the Betty Crocker website.  So, of course I pinned it to Pinterest!  And made it for dinner tonight.  Except that I forgot to add the chicken - didn't even think about it until I was eating!  But, you know what?  It was really good even without the chicken.


Here's the recipe:

Chicken, Spinach and Mushroom Pasta

Ingredients:
  • 8 oz spaghetti, cooked, reserving 1/3 cup pasta water
  • 2 tablespoons butter
  • 5 oz sliced mushrooms
  • 1 small onion, finely chopped
  • 1-1/2 cups loosely packed spinach
  • 3 to 4 cloves garlic, finely chopped
  • 2 tablespoons flour
  • 1 cup half-and-half
  • 3/4 cup cubed, cooked chicken (rotisserie chicken works great)
  • 2 tablespoons shredded Parmesan cheese
  • Salt
  • Pepper 
  • 1/3 cup reserved pasta water
Directions:
  1. In large skillet, heat butter over medium heat. Cook mushrooms, onions and spinach in butter until vegetables are softened and spinach is wilted, about 4 to 5 minutes.
  2. Stir in garlic. Add the flour and stir for 1 minute until the pasty taste cooks off. Add the half-and-half and stir slowly as sauce thickens. Add the chicken to skillet; cook until hot, stirring occasionally. Stir in Parmesan cheese. Season with salt and pepper to taste.
  3. Add cooked spaghetti and reserved pasta water. Stir to combine.

I used Angel Hair pasta, because that's what I had.  I didn't measure the mushrooms or spinach, just used a little more than half an 8-oz. package of mushrooms - that would be 5 ounces, right? -  and washed a bunch of spinach.  It looked like more than the 1-1/2 cups the recipe called for.  I think I could have used more - spinach cooks way down, so I think it would be hard to use too much. 

And, I forgot the chicken.  But, like I said, it was good even without the chicken.  I did not measure the pasta water that I added, but it was definitely more than 1/3 cup, so do not drain the pasta and pour the water down the drain until you're sure the sauce and pasta are the right consistency - and then save some more because it will thicken up.  I think it's better with a little extra liquid and not too thick, at least that's my preference.

We had some leftovers, so I'm planning to add the chicken then, or at least some chicken.  I'm also thinking of adding a can of diced tomatoes to change it up a bit.  I got some diced tomatoes with rosemary and oregano that ought to be just the thing.
Enhanced by Zemanta

Saturday, July 14, 2012

When to Buy Organic

I admit - I think I should be buying organic fruits and vegetables, but I just can't bring myself to pay the cost difference.  Is it important to only buy organic?  Or are there certain fruits and vegetables that don't matter so much if they're organic or not?  I really don't know, so when I saw this on Facebook this evening, I thought it would be worth holding onto.  It's a list of the fruits and vegetables that you really should buy organic, along with a list of 15 fruits and vegetables that are lowest in pesticides and safest to purchase conventionally.


The list is designed to be printed out so you can carry it with you to the grocery store and have a handy reference.  It doesn't list everything, but it's a good start.  I can tell by looking at the list that I am buying some of the worst ones and should definitely look into switching to organic, but it's nice to see some of my favorites on the other side, too - so I can just concentrate on fixing the bad ones first.

Here's a list of 45 popular fruits and veggies, ranked from highest to lowest amounts of pesticide residue, if you'd like some more information.
Enhanced by Zemanta

Wednesday, July 4, 2012

Beef Jerky

One of my friends posted this picture on facebook and said that she's starting a batch of beef jerky.  Why have I not tried this before?  We love beef jerky.  So, of course I asked what she marinates it in and how long it takes. (I've pretty much only used the dehydrator to dry apples so far - which are really good, and I need to do some more)

Here's her recipe:


Beef Jerky

  • Marinate 1 lb. thin sliced ribeye in 1/2 C soy sauce, 1 tsp liquid smoke, 1 tsp onion juice,1 tsp chopped garlic, 1 tsp salt. 
  • Shake on cayenne pepper when you put it in the dehydrator. 

It can take anywhere between 4 -12 hours to dry depending on your dehydrator and how many layers you put it in. Drying it overnight works well.

And some other recipes to look at and try:

Dehydrator Beef Jerky - recipes and instructions.
Enhanced by Zemanta

Sunday, June 24, 2012

Make Your Own Almond Milk

English: Raw Almond Milk. Brightened version o...
English: Raw Almond Milk.
(Photo credit: Wikipedia)
I saw this on facebook tonight and had to grab the recipe. It's supposed to be so much healthier than buying almond milk at the store because of the chemicals that is used in it. It's also cheaper.

Almond Milk
  • 1 cup raw almonds
  • water for soaking nuts (Soak overnight)
  • 3 cups pure water
  • 2 dates (optional)
  • 1/2 tsp vanilla (optional)

Drain the water from the almonds and discard. Blend the 3 cups of water, almonds and dates until well blended and almost smooth.

Strain the blended almond mixture using a washcloth, cheesecloth, or other strainer.

Homemade raw almond milk will keep well in the refrigerator for three or four days.

  Between this recipe and the other related recipes, I ought to find something that I like.  I definitely must try this.
Enhanced by Zemanta

  © Blogger template 'Totally Lost' by Ourblogtemplates.com 2008 - Header credit: Steve Wampler

Back to TOP