bcmom's kitchen

bcmom's kitchen
Showing posts with label snacks. Show all posts

Friday, October 16, 2015

Peggy's Original Veggie Kablooie!!!
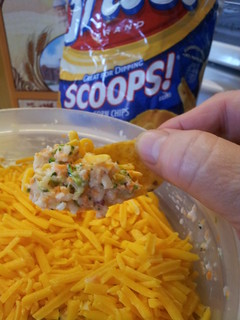
Veggie KablooieMy friend Peggy has been making this incredibly tasty and addicting stuff we call Veggie Kablooie for a while now.  It's always a big hit at potlucks, and everyone looks forward to it.  She posted the recipe a while back, and I meant to share then, but somehow I just never got around to it.  I even made my own batch of Veggie Kablooie from the recipe.  It was good, but not as good as Peggy's.  (Now you know, Peggy)

Then last night Peggy posted something on Facebook asking if she should make Veggie Kablooie for the Barn Party this weekend, and I was reminded that I never posted this.  I don't get to go to the Barn Party - since it's in Wisconsin, and I'm in Indiana - so I won't get to have any Veggie Kablooie, but I can finally get around to sharing the recipe.  Seriously, you have to try this stuff.  So good!

Posted by permission:
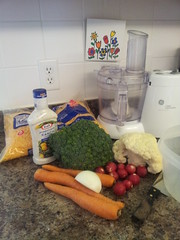

Veggie Kablooie ingredientsThis recipe evolved over a year or so until it became what it is. It's something that is welcomed with open arms (hands and mouths!) whenever I bring it to a party.

What is it??? It's good for you! Well, it must be since it is filled with vegetables! It's a snacker's delight!  It's vegetables that went.....
Kablooie!!!!!

Many of my friends have asked me for my recipe and I have given them a print out from my computer. No one has ever gotten back to me to say they made it and it's just as good as mine... or even told me they made it. So I can't say this recipe has been tested by anyone but myself, and I actually never really measure anything when I make this. I just kinda go by what looks right.
 

This is what you need for Peggy's Original Veggie Kablooie:

  • A food processor
  • 2 parts broccoli
  • 2 parts cauliflower
  • 2 parts carrot
  • 1 part radish, the ones with the greens on top are the best.
  • 1 part onion--yellow, white, or, for color use the purple ones
  • 1 part green pepper (optional- I think it adds a brightness to the Kablooie)
  • 1 part shredded mild cheddar cheese
  • enough Kraft Peppercorn Ranch dressing to moisten
  • 1 or more bags of Fritos Scoops (not pictured here)
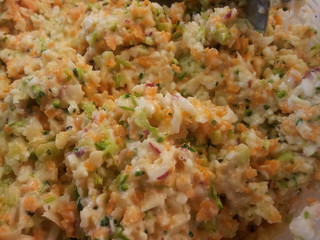
Veggie KablooieDirections:

Take all the veggies and grind them up, add enough dressing to moisten, add the cheese no more than 4 hours before serving. Eat with Fritos Scoops (best), or other chips or coin shaped carrots. or scoop-cut bell peppers or other scooplike things.. NOT celery! You will ruin it with celery!

You can also stuff pita pockets, or eat it like coleslaw!


For a complete picture tutorial, visit What!!!! You've NEVER heard of Veggie Kablooie?????

Sunday, May 3, 2015

Frozen Chocolate Covered Banana & Peanut Butter Bites


It's time again for Secret Recipe Club reveal!  My secret blog assignment this month was Not Enough Cinnamon.  Born and raised in Paris, Marie now lives in Sydney, Australia.  Her blog is full of unfussy recipes you can actually make, with simple ingredients you probably already have. I love that approach! Many of Marie's recipes also focus on health and using real, unprocessed ingredients.

There were so many yummy sounding recipes to choose from!  Some that caught my eye were:
I'm pretty sure I will be trying several of those recipes!  But the second I saw this recipe for Chocolate Covered Frozen Peanut Butter & Banana Bites, I knew I had to try it.  To be honest, I wondered why I'd never thought of it.  You're wondering the same thing right now, aren't you?  Three perfect flavors together, frozen, in bite-sized pieces. What could be better? 


Frozen Chocolate Covered  Banana & Peanut Butter Bites
from Not Enough Cinnamon

Ingredients:
  • 3 medium-ripe bananas
  • 1/4 cup peanut butter
  • 10 oz dark chocolate
  • coconut oil (optional)
Directions:
  1. Slice bananas and place on baking sheet lined with parchment paper or silicon mat.
  2. Put peanut butter on half of the banana slices and place a second slice on top.  Place in freezer and freeze for at least 1 hour.
  3. Break chocolate into pieces and put 2/3 of it in a double boiler or place a heatproof bowl over a small saucepan filled with simmering water. On low heat, stir chocolate until melted. (Or place chocolate into a microwave safe bowl. Microwave on medium power for 30 seconds, stir, then repeat at 15 second intervals until the chocolate has melted.) Add the remaining 1/3 of the chocolate and keep stirring until it is fully melted. This is to allow the chocolate to have a glossy texture and to set correctly.
  4. Remove bites from the freezer and dip them in melted chocolate. Working quickly, so bites don't begin thawing, dip one bite at a time in melted chocolate and roll it to cover all sides. Use one fork to remove bite from chocolate and a second fork to remove excess chocolate and arrange bite back on baking sheet. You may want to leave most of the bites in the freezer and work with a few at at time so they don't start getting mushy.
    Note: I have not worked with chocolate much, so I had some issues with this.  The frozen bites made my chocolate stiffen up so that I couldn't coat any more of them.  I added about a T of coconut oil, stirring that into the chocolate, over low heat, until it was smooth and shiny again, and then I could coat the rest.  Only use coconut oil as needed.
  5. Once all the bites have been coated in chocolate, return them to the freezer and freeze for at least 3 hours.  Slide a butter knife under each of the bites to remove them from the baking sheet without losing any of the chocolate and store in a covered container in the freezer.  Enjoy!

Oh yum!  I pretty much always have frozen bananas in the freezer.  Yes, they're great for making a batch of banana muffins, but they're also the perfect snack on a hot day.  Add some peanut butter and chocolate, and it's even better!  The hardest thing is going to be not eating all these at once.


Tuesday, April 21, 2015

Southwestern Hummus

I only recently discovered hummus. Well, in the last few years anyway.  I'm not sure why I never tried it before that, but I'm crazy about it now.  Of course, the best hummus is the kind you make at home, and this recipe for Really Smooth Hummus is my favorite.  I love it with with pita chips and celery especially.

But sometimes (OK, a lot of the time) I just have to try something new.  I had pinned this recipe on Pinterest, and when my friend Jennifer asked me to bring an appetizer when we went over to their house for dinner, I had the perfect opportunity to try it.  (Note: when trying new recipes, it's always good to try them when you're taking food to share with lots of people.  That way, if it's not good, you don't have to eat it all yourself.  And if it is good, everyone thinks you're a great cook.  It's a win-win situation, really.)


This was definitely a win!  This recipe is one of my new favorites.  It's a variation on the traditional hummus, made with Great Northern beans and southwestern spices, and it is yummy and so smooth.  The Great Northern beans blend up so nicely, and this comes together quickly and easily.

Southwestern Hummus
from an Aldi recipe

Ingredients:
  • 2 15.5-ounce cans Great Northern beans, drained and rinsed
  • Zest of 1 lime
  • Juice of 1 lime (about 1/4 cup)
  • 1/4 tsp each - garlic powder, onion powder, cumin, paprika, chili powder, salt, black pepper
  • 1 T chopped cilantro
  • 1/4 cup olive oil
  • Garnish:
    1/2 Roma tomato, diced
    1 tsp chopped cilantro
    1 tsp. olive oil
Directions:
  1. In a food processor, combine all ingredients except garnish and process until smooth, 1 to 1-1/2 minutes. Transfer hummus to a serving bowl.
  2. In a small bowl, combine garnish ingredients and place on top of hummus. Serve with vegetables.

This would probably also be good with tortilla chips or maybe pita, but the veggies were perfect.  I especially loved it with the red pepper, celery, and broccoli.  It looked pretty, too!  Of course, I won't always put together an entire veggie tray when I make this, but it was a special occasion.


The original recipe called for an entire Roma tomato in the garnish, but 1/2 was enough.  I guess it depends on the size of your tomato.  This hummus would be good on its own, but that garnish adds a touch of freshness and makes it really special.  A bit of finely diced jalapeno might be nice, too - if you're feeding people who like a little spice.


The consensus is that this recipe is a keeper.  I'll definitely be making it again. 

Friday, December 5, 2014

ROLO Pretzel Delights

If you regularly buy ROLO Chewy Caramels in Milk Chocolate, you have probably seen this recipe.  I've only recently tried them, and they are really yummy - chocolate, caramel, what's not to love?  But, it was only after we'd finished the bag that I noticed the recipe on the back for these ROLO Pretzel Delights.  They sounded really yummy - chocolate, caramel, and crunchy, salty pretzels.  So I bought another bag just so I could try these.  Yep, they really are as good as they sound!  And so easy.


ROLO Pretzel Delights
from Hersheys.com

Ingredients:
  • Small pretzels
  • ROLO candies
  • Pecan halves (or additional pretzels)
Directions:
  1. Heat oven to 350°F.
  2. Place one pretzel for each treat desired on cookie sheet. Top each pretzel with one unwrapped ROLO.
  3. Bake 3 to 5 minutes or until chocolate begins to soften, but not melt. Remove from oven; top with either a pecan half or an additional pretzel, pressing down slightly. Cool completely.

The recipe said to line the cookie sheet with parchment paper or foil, but I just placed my pretzels directly on my cookie sheet.  That seemed to work just fine.  I did half with pecan halves and half with additional pretzels, and I liked them both.  These are a really delicious and simple to make treat.


Sunday, November 30, 2014

Spicy Chocolate Snickerdoodles


It's time again for Secret Recipe Club reveal!  My secret blog assignment this month was Lisa's blog Sweet as Sugar Cookies.  As her blog title would suggest, Lisa is "all about the sweets" so there are plenty of yummy looking sweets to choose from.  There are, of course, lots of cookies and an entire list of recipes just for chocolate chip cookies.

I figured it was only right that I make some kind of cookies from Lisa's blog, and when I saw these Mexican Chocolate Snickerdoodles I knew they were the ones. I've always loved Snickerdoodles - though I haven't made them in ages - and the addition of chocolate with a kick of cayenne made them sound absolutely irresistible.


I did think about making these Strawberry Lemonade Muffins, but then I went right back to the cookies. I'll definitely be trying those muffins sometime, though!


These cookies bake up slightly crunchy on the outside, soft and cake-like on the inside.  I especially love that little bite from the cayenne, especially in the cinnamon sugar mix on the outside.  So good!  My husband doesn't like a lot of spice in his food, but even he enjoyed them, so they're not super-spicy - just have that little kick to make them fun.


Spicy Chocolate Snickerdoodles
adapted from Sweet as Sugar Cookies

Ingredients:
  • 1/2 c. butter, softened
  • 1/2 c. granulated sugar
  • 3/4 c. brown sugar, packed
  • 2 eggs
  • 2 tsp. vanilla
  • 2 c. unbleached flour
  • 1/2 c. unsweetened cocoa powder
  • 1/2 tsp. cream of tartar
  • 1/2 tsp. baking soda
  • 1/2 tsp. salt
  • 1/2 tsp. cayenne pepper
For rolling:
  • 1/4 c. sugar
  • 2 tsp. cinnamon
  • pinch of cayenne pepper 
Directions:
  1.  Cream butter and sugars together.  Add eggs and vanilla; mix well.
  2. Combine flour, cocoa, cream of tartar, baking soda, salt and cayenne.  Mix in and stir until well combined.  Chill dough for about an hour.
  3. Roll dough into 1" balls and roll in cinnamon/sugar mixture.  Place on ungreased cookie sheet and bake 10-12 minutes at 350°, until cracked on top.  Cool 2-3 minutes on cookie sheet before removing to wire rack to cool.
Makes about 4 dozen


Thursday, August 8, 2013

Really Smooth Hummus

A couple weeks ago I couldn't find my 'regular' hummus recipe so I went looking for one online.  That's when I found this recipe that promised the secret to smooth, better-than-storebought hummus.  So I tried it.

And now this is my regular hummus recipe. 


Smooth and Easy Hummus
from Inspired Taste

Ingredients
  • One 15-ounce can chickpeas (garbanzo beans)
  • 1/4 cup fresh lemon juice, about 1 large lemon
  • 1/4 cup tahini
  • Large garlic clove, minced
  • 2 T olive oil, plus more for serving
  • 1/2 to 1 tsp salt, depending on taste
  • 1/2 tsp ground cumin
  • 2 to 3 T water
  • Dash of ground paprika for serving
Directions:
  1. In the bowl of a food processor, combine tahini and lemon juice. Process for 1 minute. Scrape sides and bottom of bowl then turn on and process for 30 seconds. This extra time helps “whip” or “cream” the tahini, making smooth and creamy hummus possible.
  2. Add the olive oil, minced garlic, cumin and the salt to whipped tahini and lemon juice. Process for 30 seconds, scrape sides and bottom of bowl then process another 30 seconds.
  3. Open can of chickpeas, drain liquid and rinse. Add half of the chickpeas to the food processor and process for 1 minute. Scrape sides and bottom of bowl, add remaining chickpeas and process for 1 to 2 minutes or until thick and quite smooth.
  4. Most likely the hummus will be too thick or still have tiny bits of chickpea. To fix this, with the food processor turned on, slowly add 2 to 3 tablespoons of water until the consistency is perfect.
  5. Scrape the hummus into a bowl then drizzle about 1 tablespoon of olive oil over the top and sprinkle with paprika.
  6. Store in an airtight container and refrigerate up to one week.

Yum!  This is so good with veggies and pita chips.  Does this method really make a difference?  I'm not completely sure, but I had at least one comment about how smooth it was, so I'm going with it.  The flavors are also perfect.  I didn't have any fresh lemons, so I used the lemon juice out of a bottle, and it turned out fine.  I also used home-cooked chickpeas and saved some of the cooking water to add at the end.

I'm making this again as soon as I buy more celery.  Hummus and celery is one of my favorite things.  And those sea salt pita chips from Aldi.  Have you tried those?  The best pita chips ever.  To go with this - the best hummus ever.

Wednesday, February 13, 2013

Mediterranean Marinated Cheese

Going through things for packing, sorting, tossing, etc. I found this Kraft foods calendar from (I don't know what year it's from), and I tore out just one page because the recipe looked so good.  I've been going through my Kraft Food & Family magazines and saving all the recipes I want to keep in my Kraft Recipe Box, so I can recycle the magazines instead of packing them.  I figured I could do the same with this recipe, but it's not there.  So, I'm typing it up here.  I even took a picture of the picture.  It just looks so good.


Only 2 pieces each?

Monday, September 17, 2012

Jalapeno Poppers

I made these Baked Jalapeno Poppers last year.  They were so good that I planted jalapenos this year just so I could make them again!  (Yes, I know I can buy jalapenos in the store, but I know these are so much better!)

My garden has been pretty pitiful this year, but the jalapenos produced quite well.  I picked a bunch of them today, along with a few sweet peppers, one decent-sized tomato as well as some really little ones, and a small cucumber.  I cut some chard, too, though it's not pictured here.

Then, I got busy making Poppers.  First I mixed cream cheese and Mozzarella with cumin and cayenne.  Then I made bread crumbs by putting a couple slices of bread in the Ninja and then mixed the resulting crumbs with the seasonings in a pie plate.  Then I mixed up the eggs and milk in a small bowl and mixed the seasonings and flour in another pie plate.  And then I cut up some of the peppers.

The original recipe said 12 jalapenos, but I noted that I used more last year, so I started with 18.  Then I started putting the cheese mixture into the jalapeno halves.


After I'd filled all the jalapeno halves, I still had cheese left, so I cut up a few more peppers, for a total of 22.  And I put cheese into those, too.  Then it was time to roll the filled jalapeno halves in the egg mixture, flour, and bread crumbs - first the egg mixture, then the flour, then egg mixture again, then bread crumbs - one hand for wet and one hand for dry.  Even doing it that way, it was messy!

I put the finished poppers on cookie sheets lined with waxed paper.


Then all of the finished jalapeno poppers - except for the three I baked and ate for lunch - went into the freezer.  Once they're frozen, I'll put them all into a container (or containers) and they'll be ready any time I want some yummy Jalapeno Poppers.  Just pull them out of the freezer and bake them for a delicious treat!

That's what I love about these - they're baked, not fried!  Here's the recipe, as I made them today.

Baked Jalapeno Poppers

Ingredients

  • 22 fresh jalapeno peppers, halved lengthwise, stems, seeds and membranes removed
  • 8 ounces cream cheese, softened
  • 2 cups grated Mozzarella cheese
  • 1/2 teaspoon ground cumin
  • 1/2 teaspoon cayenne, or less, to taste
  • 3 large eggs
  • 3 tablespoons milk
  • 6 teaspoons Essence, recipe follows
  • 3 cups breadcrumbs
  • 3/4 cup all-purpose flour
Directions
  1. In a bowl, cream together the cream cheese, Mozarella cheese, cumin, and cayenne.
  2. In a small bowl, beat together the eggs, milk, and 2 teaspoons of the Essence. In a shallow dish, combine the bread crumbs with 2 teaspoons of Essence. In a third dish, combine the flour and 2 teaspoons of Essence. 
  3. Spread cheese mixture into the middle of each jalapeno half. One at a time, dip into the egg mixture, dredge in the flour, dip into the egg mixture, then dredge in the bread crumbs, pressing to coat. Place the coated peppers, cut side up, on lightly greased a baking sheet and bake at 350° F until the filling is runny and the crust is golden, about 30 minutes.  (or place them on a waxed-paper lined cookie sheet and freeze.  Once frozen, layer them in a container with waxed paper between layers.  When ready to use them, remove from freezer and follow directions for baking.)
  4. Remove from the oven and serve immediately with cold beer.  (or milk)
*Essence (Emeril's Creole Seasoning):
  • 2 1/2 tablespoons paprika
  • 2 tablespoons salt
  • 2 tablespoons garlic powder
  • 1 tablespoon black pepper
  • 1 tablespoon onion powder
  • 1 tablespoon cayenne pepper
  • 1 tablespoon dried leaf oregano
  • 1 tablespoon dried thyme
Combine all ingredients thoroughly and store in an airtight jar or container.

Yield: about 2/3 cup

I made the Essence seasoning last year when I made these.  I still had plenty to use this year.  The recipe makes way more than you'll need just for the poppers.

I only used about half the jalapenos I picked today, and there are more, smaller ones still on the plants, so I'll probably be making at least one more batch of these - once I get the cookie sheets cleaned off so I have somewhere to put them.  That ought to give us enough jalapeno poppers to get us through for a month or two!

Sunday, May 20, 2012

Cream Cheese Pesto Dip

This dip is really easy to make, and so good!

Cream Cheese Pesto Dip

Ingredients:
  • Cream cheese
  • Minced garlic
  • Pesto
  • Feta
  • Diced tomatoes
Directions:
  1. Layer all ingredients - no measurements, just whatever looks/sounds good to you.
  2. Warm 10-15 minutes at 350°
  3. Serve with bagel chips.
Yum!

Seriously, it is hard to stop eating this stuff.  I use a block and a half of cream cheese - because that's what fits in the dish I want to use.  Then I layer lots of garlic, pesto and feta on top, and cover it with diced tomatoes (from a can - not the whole can, though, just enough to cover).  I used pesto I made last summer and froze in a 1/2 cup Rubbermaid container.  I just thawed it out and spread the whole thing on top of the garlic.  (Time to plant some more basil!)


You can serve this cold, but it's so much better when warmed up. You're not really cooking it but just warming it up so that the cream cheese gets all soft and all the flavors blend.  Also, it's good with other crackers or chips like Pita chips, but it is best with the New York Style Sea Salt Bagel Crisps - trust me on this!  They just go together perfectly -and those bagel crisps can hold a lot of dip.


Tuesday, May 15, 2012

Happy Hummus Day!

Vitamix posted this recipe on Facebook today - in honor of National Hummus Day. Did you know it was National Hummus Day? Me either, but I love some good hummus, so I thought I'd grab the recipe.  I know there are plenty of hummus recipes available online, but so many of them call for tahini, and I haven't been able to find it.  Should it be in my local grocery store?   This recipe doesn't call for it, so I'm gonna give it a try.

Hummus

Ingredients
  • 2 (15-ounce) cans chick peas (garbanzos), one drained, one with liquid
  • 1/4 cup (35 g) raw sesame seeds
  • 1 tablespoon olive oil
  • 1/4 cup (60 ml) lemon juice
  • 1 garlic clove, peeled
  • 1 teaspoon cumin
  • Salt

Directions
  1. Place all ingredients, except salt, into the Vitamix container in the order listed and secure lid.
  2. Select Variable 1.
  3. Turn machine on and slowly increase speed to Variable 10, then to High.
  4. Blend for 1 minute, using the tamper to press the ingredients into the blades.
  5. Season to taste with salt.

  Of course, I'll have to use my Ninja, since I don't have a Vitamix, so no Variables, but....

Do you have a favorite go-to hummus recipe?  Please share!  Know where to buy tahini?  Share that too.   Maybe I should have though to buy Tahini on Amazon! because there's plenty available. Now to figure out which one...

Friday, January 27, 2012

Buffalo Roasted Chickpeas

When I saw this recipe on Modern Mom, I just had to try it.  I've never been a huge fan of chickpeas (or Garbanzo Beans) but I love anything with buffalo hot sauce, so I thought they'd be worth a try.  And the picture just plain looked awesome!  So I made them, and they are oh, so good!  I will definitely be making these again!

Buffalo Roasted Chickpeas

Ingredients:
Directions:
  1. Drain and rinse garbanzo beans; pat dry with towel. Spread onto baking sheet.  (not too big.  a 13x9" pan would work just fine)
  2. In small saucepan over medium-low heat, melt butter; add hot sauce and stir to combine.
  3. Pour hot sauce mixture over beans; toss to coat evenly.
  4. Bake 30 to 40 minutes at 450°, stirring/shaking the pan occasionally - until browned.
  5. Cool - if you can wait that long - and enjoy!


These make a great snack. It's really hard to stop munching on them!  That's not all bad, because, according to Dr. Oz - you can eat triple the amount of these roasted chickpeas as nuts - for the same number of calories!

It also made me wonder how many other ways I can roast chickpeas, so I went looking for recipes and found these:
  1. w/ cayenne and cumin (and a very funny story, too)
  2. w/ olive oil, garlic, and cayenne
  3. w/ vinegar and mustard
  4. w/ Moroccan spices
  5. and more
 They're all pretty much the same - drain your beans, toss with oil and spices of your choice, and roast at a high temperature until browned and crunchy.  Pretty much like this page said - salt, seasoning blend of your choice, garbanzo beans, olive oil - and there are a bunch more recipes linked and listed there.  Easy, easy, easy!  and you end up with a healthy, high fiber snack.

Sunday, January 15, 2012

Cranberry Cream Cheese Dip

My friend Peggy posted this recipe for Cranberry Cream Cheese Dip on my facebook wall a few weeks ago.  She knows me well - anything cranberry, and I'm all over it!  I finally got a chance to make this last weekend, and it is amazing! All the flavors just combine to make your mouth happy...


Cranberry Cream Cheese Dip

Ingredients:
  • 1 12-oz package fresh cranberries (3 cups)
  • 1/4 cup green onion, chopped
  • 1/4 cup cilantro, chopped
  • 1 small jalapeno pepper
  • 2/3 cup sugar
  • 1/4 t cumin
  • 2 T lemon juice (or lime)
  • dash salt
  • 2 8-oz packages cream cheese
Directions:
  1. Coarsely chop cranberries in Ninja or food processor and place in medium bowl
  2. Chop onions, cilantro, and jalapeno and add to cranberries
  3. Mix in sugar, cumin, lime juice, and salt
  4. Cover and refrigerate at least 4 hours or overnight
  5. When you're ready to serve: soften cream cheese and spread it on a plate, serving platter, or the bottom of a 13x9" baking dish; spread cranberry mixture evenly over the top.
  6. Serve with Ritz (type) crackers, Wheat Thins, or tortilla chips


  I cut the sugar down significantly from the original recipe - from 1-1/4 cups to just 2/3 cup.  I think it could be cut down a tiny bit more, but then I like the tartness of the cranberries, so it's probably a good balance.  I used lime juice, because I had a lime I needed to use and no lemons.  It all worked together really well.


We tried it with Wheat Thins, tortilla chips, and the Ritz type crackers, and it tastes good with all of them - but the Ritz type are the best.  Everyone who tasted this thought it was great - my husband who does not like cilantro, my friend Peggy who sent me the recipe and doesn't even like cranberries, my son who - well, I expected him to like it!  I never would have thought to mix these particular ingredients together, but the combination really is magic.  I will be making this again!!  I don't expect it will last long...

Sunday, November 6, 2011

Apples and Apple Dip

Apples are an all-American success story-each ...Image via WikipediaI love apples.  They make great snacks.  They're good with popcorn, good with peanut butter, really good with this apple dip recipe I tried recently.  They're also good in pies, crisps, cakes, and muffins.

The problem I have is remembering which apples are good for what - which ones are for eating, which ones for baking and cooking.  So, when I found a list in the food section of my newspaper describing apple varieties and what they're good for, I saved it.

These are some of Wisconsin's favorite apples:
  • Gala apples are small to medium in size with a yellow-pinkish skin.  Sweet and juicy, they are good for salads and cooking.
  • Paula Red apples are medium-sized and are red over green skin.  Juicy and sweet, they are great for both cooking and eating.
  • Fuji apples are large, with a reddish-pink skin.  They are sweet and best for eating and salads.
  • McIntosh apples are small to medium in size with a bright red skin.  Mild, they are good for cooking, eating, and sauces.
  • Honeycrisp apples are larger, with a red and green skin.  They are juicy, sweet and crisp.  Great for eating.
  • Golden Supreme apples are medium-sized and sweet.  They are good for eating, salads and sauces.
  • Ginger Gold apples are medium to large with a yellow skin.  Juicy and sweet, they are good for eating and baking.

I'm not sure if that helps or not.  I'll probably still buy my apples the way I usually do - by smelling them and buying the ones that smell the best.  I do know that I like tart apples like Granny Smith with that Apple Dip!  What?  You want the Apple Dip recipe?  All right, here you go.  I went looking for an apple dip recipe online - there are lots - and combined a couple that sounded good.

Apple Dip
  • 1 (8 oz.) pkg. cream cheese, softened
  • 1/2 c. crunchy peanut butter
  • 3/4 c. brown sugar
  • 1 tsp. vanilla
Mix all ingredients together, then stir in some Heath bits o brickle (baking bits). I didn't measure them, just poured some in.

Serve with sliced apples. Tart apples are best.

This stuff was really popular!  It can be made without them, but the toffee bits really add something.  Somebody asked if it was peanut brittle in there, so next time I make this I am trying peanut brittle.  It sounds like it will be good.
Enhanced by Zemanta

Friday, September 16, 2011

Baked Jalapeno Poppers

Baked Jalapeno PoppersImage by fritish via FlickrSince I have all these hot peppers, I went searching for a recipe for jalapeno poppers and found this post about baked jalapeno poppers - which linked to this recipe - Baked Jalapeno Poppers. Perfect!  I didn't want anything deep fried - mostly because it makes a mess, but also because too much grease makes me feel sick.

Baked Jalapeno Poppers

Ingredients
  • 12 fresh jalapeno peppers, halved lengthwise, stems, seeds and membranes removed
  • 6 ounces cream cheese, softened
  • 1 1/2 cups grated Monterey Jack or mozzarella cheese
  • 1/2 teaspoon ground cumin
  • 1/2 teaspoon cayenne, or less, to taste
  • 2 large eggs
  • 2 tablespoons milk
  • 6 teaspoons Essence, recipe follows
  • 1 cup breadcrumbs
  • 1/2 cup all-purpose flour
Directions
  1. In a bowl, cream together the cream cheese, Monterey Jack cheese, cumin, and cayenne.
  2. In a small bowl, beat together the eggs, milk, and 2 teaspoons of the Essence. In a shallow dish, combine the bread crumbs with 2 teaspoons of Essence. In a third dish, combine the flour and 2 teaspoons of Essence. 
  3. Spread cheese mixture into the middle of each jalapeno half. One at a time, dredge in the flour, dip into the egg mixture, then dredge in the bread crumbs, pressing to coat. If necessary, repeat the process. Place the coated peppers, cut side up, on lightly greased a baking sheet and bake at 350° F until the filling is runny and the crust is golden, about 30 minutes.
  4. Remove from the oven and serve immediately with cold beer.  (or milk)
*Essence (Emeril's Creole Seasoning):
  • 2 1/2 tablespoons paprika
  • 2 tablespoons salt
  • 2 tablespoons garlic powder
  • 1 tablespoon black pepper
  • 1 tablespoon onion powder
  • 1 tablespoon cayenne pepper
  • 1 tablespoon dried leaf oregano
  • 1 tablespoon dried thyme

Combine all ingredients thoroughly and store in an airtight jar or container.

Yield: about 2/3 cup

I didn't follow the original recipe exactly - partly because I wrote it down wrong and partly because it called for 1 T of the cream cheese filling in each jalapeno half, but that seemed like too much - so I just gave up any pretense of measuring after the first half and simply filled them.  I stopped counting how many peppers I used, but it was definitely more than 12.  I had to add more bread crumbs because I ran out before I ran out of cream cheese mixture or anything else.  About the time I finished dredging all the peppers in flour, egg mixture, and bread crumbs, I decided to try egg mixture, flour, egg mixture again, bread crumbs - and that seemed to work better.  Just remember the cardinal rule - wet with one hand, dry with the other - or you'll end up with a huge mess.  It's messy enough as it is.

I did not bake all of these - just a few because I just had to try them.  I put them all on a wax paper-covered cookie sheet and placed them in the freezer.  Once they're frozen, I will place them in a sealed container, probably with wax paper between layers - all ready to take out and bake whenever I get the urge.

The few that I did bake and try?  Amazing!  Seriously.  These are so good.  Yes, they take quite a bit of time to prepare, but I'm thinking they're worth it.

Enhanced by Zemanta

Thursday, July 7, 2011

Lemonade Yogurt Popsicles

I found this recipe for Lemonade Yogurt Popsicles on Baking Bites, and I just had to try them. They're in the freezer now.

Lemonade Yogurt Popsicles
  • 1-1/3 cups lowfat yogurt, plain or vanilla
  • 1/4 cup fresh lemon juice
  • 5 tbsp sugar
  1. In a small, microwave safe bowl, heat up the lemon juice and dissolve all the sugar into it.
  2. Pour lemon mixture into a medium bowl with the yogurt and whisk until smooth.
  3. Divide into popsicle molds and freeze, for at least 2 hours or overnight.
  4. Dip popsicle molds in hot water to release the pops before serving.

I used my Tupperware popsicle molds - the ones I used to use all the time when the kids were younger - and got 6 full ones and a partial.  Next time (see, I'm already assuming there's gonna be a next time) I'll add just a touch more yogurt so I can fill them all up.
 
Enhanced by Zemanta

Thursday, May 26, 2011

Jack Black Bean Dip

This sounds really good!  I'll just have to see if we have any Jack Daniel's® around here...

Jack Black Bean Dip

Ingredients:
  • 2 tablespoons vegetable oil
  • 1 medium onion, chopped
  • 2 cloves garlic, minced
  • 2 cans (about 15 ounces each) black beans, drained
  • ¼ cup Jack Daniel's® Tennessee Whiskey
  • 1 teaspoon ground cumin
  • 2 tablespoons fresh lemon juice
  • Hot pepper sauce, to taste
Directions:
Heat oil in a large saucepan. Stir in onion and garlic, and cook over medium heat until onions are tender, about 5 minutes. Stir in beans, Jack Daniel's®, and cumin. Cook until bubbly and heated through. Mash beans lightly with a wooden spoon or a fork. Stir in lemon juice and hot pepper sauce. Serve warm or at room temperature in a serving dish topped with your choice of the suggested toppings. Makes about 2 ½ cups.

Suggested Toppings: sour cream, chopped avocado, chopped tomato, sliced green onions, jalapeño peppers, chopped cilantro.

from Cooking with Jack


Monday, October 18, 2010

Sweet Potato Chips

sweet potato chipsImage by kthread via FlickrMy son Cory has been getting more leg cramps than usual, and he was looking for a good source of potassium that might help him.  Ordinarily, he'd eat bananas, but for some reason bananas make him feel bad, so he needs something else.  I searched for some good sources of potassium and found that sweet potatoes have the most.  Unfortunately, he can't just find a baked sweet potato on campus, so I'm thinking of buying him some sweet potatoes and making these sweet potato chips.  They're something he can have handy in his dorm room.

Baked Sweet Potato Chips

Ingredients
  • 1 large sweet potato peeled 
  • 2 tsp vegetable oil    
  • 1/8 tsp table salt, or to taste   
Instructions
  • Preheat oven to 400ºF. Spray 2 baking sheets with cooking spray.
  • Thinly slice potatoes in a food processor or by hand; they should be no more than 1/8-inch thick.
  • Arrange slices on baking sheets so they don’t overlap. Brush with oil and sprinkle with salt. Bake chips until they begin to lightly brown, about 15 minutes. Cool on a rack and serve.

 I'm also thinking that I'll try using some other seasonings besides salt, just to spice them up a bit. The problem is, he'll probably go through them really fast - or I might not want to share them with him once I make them.  Or I just might make these Spicy Baked Sweet Potato Fries w/ Honey Cranberry Mustard for me.  I won't have to share, because these won't keep in a dorm room!
Enhanced by Zemanta

Thursday, December 17, 2009

Buffalo Chicken Dip

Here's another recipe I found in the coupon section of my Sunday paper. This one I managed to cut out! I mixed it up today, ready to pop in the oven and enjoy this weekend.

Frank's RedHot Buffalo Chicken Dip

Ingredients:
  • 8 oz. pkg. cream cheese, softened
  • 1/2 cup blue cheese or ranch salad dressing
  • 1/2 cup any flavor FRANK'S® REDHOT® Sauce
  • 1/2 cup crumbled blue cheese or shredded mozzarella cheese
  • 2 cans (9.75 oz. each) SWANSON® White Premium Chunk Chicken Breast in Water, drained
Directions:
  1. HEAT oven to 350°F. Place cream cheese into deep baking dish. Stir until smooth.
  2. MIX in salad dressing, Frank's RedHot Sauce and cheese. Stir in chicken.
  3. BAKE 20 min. or until mixture is heated through; stir. Garnish as desired. Serve with crackers or vegetables.

I mixed everything in a mixing bowl and then put it into the baking dish. Also, I used a pint of chicken that my mom canned and gave me.

For additional tips and variations or to print it, view the original Buffalo Chicken Dip recipe.

Enhanced by Zemanta

Sunday, September 6, 2009

A Dip Recipe or Three

I made the first dip yesterday. The other two recipes I found on my yogurt container and on the Triscuit box. I haven't tried them yet, but they sound really good. I'm saving them here so I can throw the Triscuit box and the foil from the top of the yogurt away.

Cajun Tuna Spread
  • 3 ounces of cream cheese, softened
  • 3 T. mayonnaise or salad dressing
  • 1 t. paprika
  • 1/4 t. ground black pepper
  • 1/8 t. garlic powder or 1 clove garlic, minced
  • 1/8 t. ground red pepper
  • 1 6-1/2-ounce can tuna, drained and broken into chunks
  • 1/4 cup finely chopped red or green sweet pepper
  • 2 T. thinly sliced green onion (1)
In a small mixing bowl beat cream cheese, mayonnaise or salad dressing, paprika, black pepper, garlic powder or garlic, and ground red pepper until well combined. Stir in the tuna, sweet pepper, and green onion. Cover; chill for 3 to 24 hours. Serve with crackers. Makes 1-1/2 cups.

from the Better Homes and Gardens New Cookbook

The recipe says to use an electric mixer to beat the cream cheese, salad dressing and spices, but I just used a mixing spoon. It seemed to work fine. Also, I didn't have any green onions so I just used some chopped yellow onion. Really good with Triscuits and Wheat Thins.

This recipe came off the Triscuit box:

Creamy Spinach & Red Pepper Dip
  • 1 pkg. (10 oz.) frozen chopped spinach, thawed, well drained
  • 4 oz. (1/2 of 8 oz. pkg.) cream cheese or 1/3 less fat Neufchatel cheese, softened
  • 1/2 cup grated Parmesan cheese
  • 1/3 cup chopped roasted red peppers
Mix all ingredients; cover. Refrigerate several hours or until chilled. Makes 1-1/2 cups.


veggies_and_dipImage by bcymet via Flickr
This one came from Dannon:

Creamy Salsa Dip
  • 2 cups Dannon All Natural Plain Yogurt
  • 1 cup salsa
  • 3-1/2 T. chopped fresh cilantro
  • 1 t. sea salt
In bowl, combine all ingredients and mix well. Cover and keep refrigerated until ready to use.


I think all of these would be really good with either crackers or cut up veggies.

Tuesday, August 25, 2009

Chocolate Cherry Clusters

I found this recipe in a magazine and have been planning to try it for a while now. This is supposed to be a good, heart-healthy snack, and I thought it would be nice for Jeffrey to have as a snack because he loves cherries so much. I finally made them today.

Chocolate Cherry Clusters

Semi-sweet chocolate chipsImage via Wikipedia


  • 2 cups bittersweet chocolate chips
  • 1-1/2 cups Cheerios cereal
  • 1 cup dried cherries
  • 1/2 cup walnut pieces
In medium bowl, microwave chocolate on high 1 minute. Stir. Microwave 1 more minute, until nearly melted. Stir until smooth. Quickly stir in cereal, cherries and nuts until well coated. Using a tablespoon, drop clusters on a baking sheet. Refrigerate 2 hours, until no longer sticky. Makes 24 clusters.
Per cluster: 137 calories, 2g protein, 15g carbohydrates, 10g fat (4g saturated), 0mg cholesterol, 2g fiber, 13mg sodium

I didn't have any bittersweet chocolate chips, but I do have some Hershey's extra dark baking bars. I figured those would work just fine, since the chocolate must be melted. However, I did not know how many squares I would need, so I looked it up and found this handy list of chocolate substitutions. For each cup of chocolate chips, I need 6 squares of chocolate - so that's 1-1/2 of those baking bars.
Enhanced by Zemanta

  © Blogger template 'Totally Lost' by Ourblogtemplates.com 2008 - Header credit: Steve Wampler

Back to TOP