bcmom's kitchen

bcmom's kitchen

Friday, December 18, 2015

Pumpkin Cobbler

I pinned this recipe a while back and finally made it right before Thanksgiving.  It's kind of like a Hot Fudge Sundae Cake, only instead of chocolate it's made of pumpkin and spice.  Oh, this is amazing!  I was seriously tempted to make this instead of pumpkin pie for Thanksgiving.  It's that good.


I ended up making a pumpkin pie and those yummy Pumpkin Pie Crumb Bars instead, but I just may have to make this next year.  And a time or two between now and then, of course.  It's really simple to make, using ingredients you probably already have on hand, and so good.

Pumpkin Cobbler
from Lauren's latest

Ingredients:
  • 1 cup pumpkin puree
  • 2 T milk
  • 1/4 cup melted butter
  • 1-1/2 tsp. vanilla
  • 1-1/4 cups unbleached flour
  • 2 tsp. baking powder
  • 1/2 tsp. salt
  • 3/4 cup granulated sugar
  • 1 tsp. cinnamon
  • 1/2 tsp. nutmeg
  • 1/4 tsp. cloves
  • topping:
    * 1/2 cup granulated sugar
    * 1/2 cup brown sugar
    * 1/4 cup chopped pecans
    * 1-1/2 cups very hot water
Directions:
  1. Preheat oven to 350° F.
  2. In a medium sized bowl, stir pumpkin, milk, melted butter and vanilla together.  Mix flour, baking powder, salt, sugar and spices and stir into wet ingredients to create a thick batter. 
  3. Pour into a 1-1/2 quart casserole dish with high sides.
  4. In a separate bowl, stir sugar, brown sugar and pecans together. Spread evenly over the top of the batter. Pour hot water over the top.  Do not stir.
  5. Bake for 45-50 minutes or until the middle is set. {Be sure to place on a baking sheet in case it bubbles over.} 
  6. Cool 5-10 minutes before serving. Serve with vanilla ice cream or whipped cream.

It looks like an ordinary cake when you pull it out of the oven, but just wait until you scoop some of it out of the baking dish!  Hiding under that cake is a rich, amazing syrup.


It's really good nice and hot straight out of the oven with some vanilla ice cream on top - and then some of the syrup spooned over the top.  It's also very, very good the next day - cold with some whipped cream on top.  I think it might be even better.


Be sure to let me know how you like it.

Friday, December 11, 2015

For What Ails You

Someone posted this on Facebook, and it was called Sore Throat Tonic.  I wrote the recipe down so I could try it when I had a sore throat.  But it sounded so good - yep, I'm probably weird - that I just had to try it, sore throat or not.

I think it's really good.  However, I don't know how it would actually help with a sore throat.  It's a bit spicy and a little harsh, so I almost feel like it would make a sore throat worse.  What it is good for is to clear everything out.  If you've got a stuffy nose or clogged sinuses, this stuff is just what you need.  I think it's also great to drink when you feel like you might be getting a cold - to scare that baby away for good.  OK, I don't guarantee this will keep a cold away, but I did drink it quite a bit last week when I felt a cold was coming on, along with tea and hot honey lemon water and Emergen-C every day, and the cold never did develop into a full-blown cold.  So, it's definitely worth a try.

Besides, it tastes good!  Or at least I think so.


Keep the Cold Away Tonic

Ingredients:
  • 1/8 tsp. cayenne
  • 1/8 tsp. turmeric
  • 2 tsp. apple cider vinegar
  • 2 tsp. raw honey
  • a few slices raw ginger
  • squeeze of lemon (optional)
  • 1 cup boiling water

Directions:
  1. In mug, mix cayenne, turmeric, vinegar, honey, ginger and lemon.
  2. Pour boiling water in; cover and steep for at least 5 minutes.
  3. Enjoy

The original recipe did not call for lemon, but I think it really adds something to the flavor.  If you don't have lemons, don't worry about it. 

And, I just spent way too much time searching through all my photos on Flickr for a mug of tea or something to represent this, since I've never actually taken a picture, but no such luck.  You'll just have to use your imagination, or take your own pictures when you try it.  Or not.

Just enjoy.  And don't forget to chew on the ginger slices when you get to the bottom.  They have a nice bite to them.

Sunday, December 6, 2015

Crock Pot Chicken & Dumplings

It's time again for Secret Recipe Club reveal!  My secret blog assignment this month was Making Memories with your kids.  If that sounds familiar, it's because I had Erin's blog for last week's themed reveal, too.  What a bonus - I got to make two different recipes from her blog and share them with you!  Since last week's post was about sweets and Holiday Treats, I wanted something completely different this week, though I'm definitely going to make this Raspberry Cream Cheese Coffee Cake soon.

Erin is a big fan of comfort food, and that sounded like just the thing - something easy after all the prep and cooking for Thanksgiving.  Erin is a single mom of two kids, and she also works as a middle school counselor. It should come as no surprise that her blog is full of easy and kid-friendly recipes.  I am going to have to try her Crock Pot Corn Chowder, Taco Soup, and Meatloaf and Mashed Potato Cupcakes very soon, but for this week I chose this yummy Crock Pot Chicken & Dumplings.  I'm especially going to try the meatloaf and mashed potatoes.  It's definitely a kid-friendly meal, and even if I don't make the cupcakes, I am seriously going to try Erin's trick for mashed potatoes - use ranch dressing instead of milk!  Sounds good, huh?


Crock Pot Chicken & Dumplings
adapted from Making Memories with your kids

Ingredients:
  • 2 boneless skinless chicken breasts
  • 1 tsp. salt
  • 1/2 tsp. pepper
  • 1/2 tsp. garlic powder
  • 1/2 tsp. onion powder
  • 1/2 a medium onion, chopped
  • 2 cloves garlic, minced
  • 2 ribs celery, diced
  • 1 to 2 carrots, diced
  • 1/2 a green pepper, diced
  • 4 T butter
  • 2 cups chicken broth
  • 3/4 cup flour
  • 2 cups milk
  • 1/2 tsp. salt
  • 1/4 tsp. pepper
  • 1/2 tsp. turmeric
  • 1-1/2 cups peas
  • 1 (8-10.5 ounce) tube biscuit dough
  • Cornmeal
Directions:
  1. Mix salt, pepper, garlic powder, and onion powder together and use it to season chicken breasts. Place chicken in crock pot. Top with chopped onions, garlic, peppers, celery, and carrots.
  2. In a saucepan, melt butter. Stir in flour, chicken broth, milk, and salt & pepper. Pour into crock pot. Cook on low for 8 hours.
  3. 1-2 hours prior to serving, shred chicken and return to pot. Add peas (run them under water to thaw first)
  4. Cut biscuits into 4 to 6 pieces. Roll in cornmeal and then add to crock pot. Continue cooking until biscuits are firm.

Erin's recipe calls for a bag of mixed vegetables which you add at the end, where I added the peas.  it wasn't until after I'd decided on this recipe and gotten the chicken and broth out of the freezer that I realized I didn't have a bag of mixed vegetables.  So I had to improvise by adding celery and carrots, and the green pepper.  Since they were fresh and needed cooked longer than the frozen vegetables needed, I added them at the beginning with the chicken.  They turned out great.
 
I had never thought of using canned biscuits for dumplings.  Luckily I had a can in my fridge.  It was a 5 biscuit can of Grands! (10.5 oz.) so I cut them into 6 pieces because they are a bit bigger than the regular biscuits.  I also think this recipe would work great with any dumpling recipe, if you have a favorite one.  The biscuits (and the frozen vegetables) just make this recipe really simple and perfect for busy moms and anyone who wants a warm and comforting meal without too much trouble.  For best results I would suggest adding the biscuits 2 hours before you want to serve, so they have plenty of time to cook.  If you can't, just stir in the frozen veggies (thawed), add the biscuits to the top, and turn your crock pot on high for the final hour of cooking.


If you're looking for comfort food, definitely give this recipe a try.  It smelled amazing from the moment I put everything into the crock pot, and it tasted just as good as it smelled.  This recipe is definitely a keeper!


Sunday, November 29, 2015

Pumpkin Pie Crumb Bars

There are four groups in the Secret Recipe Club, and we each post once a month.  When there's an extra Monday in the month, we get an extra themed reveal, should we choose to participate. We have an extra Monday this month, and the theme is Holiday Treats.

I had the privilege of browsing Erin's blog Making Memories with your kids in search of some yummy treats.  Erin has made it especially easy to find her holiday treats, because she has a special holiday category with choices for holidays throughout the year.  With Thanksgiving this month, I went straight for the Thanksgiving page where I found these yummy looking Pumpkin Pie Crumb Bars.  These absolutely adorable Turkey Cookies look like a lot of fun, too.  They definitely fit with the theme of Erin's blog, because it is full of kid-friendly meals, recipes, and crafts.  Erin and her two amazing kids have made some fun and yummy treats as well as some very cool crafts.  Quite simply, if you are looking for fun things to do with your kids, you will most definitely want to check out this blog!

Some other recipes I thought would be perfect for Thanksgiving were:


But I went back to the Pumpkin Pie Crumb Bars.  I have tried another recipe for pumpkin pie bars in the past, but it was never as good as I thought it should be.  I thought this one just might be what I was hoping that other recipe was, and it definitely was.  So good!

Pumpkin Pie Crumb Bars
adapted from Making Memories with your kids

Ingredients:
  • For the crumb layers:
    * 1-1/4 cups flour
    * 1-1/2 cups quick oats
    * 1/2 tsp. salt
    * 1/2 tsp. baking soda
    * 1/4 cup sugar
    * 1/2 cup brown sugar
    * 3/4 cup melted butter
    * 1 tsp. vanilla
  • For the filling:
    * 2 eggs
    * 3/4 cup sugar
    * 1 tsp. cinnamon
    * 1/2 tsp. salt
    * 1/2 tsp. ginger
    * 1/4 tsp. cloves
    * 1 (15 oz.) can pumpkin
    * 1 (12 oz.)  can evaporated milk
Directions:
  1. Preheat oven to 350° F. Grease an 11x7" pan; set aside.
  2. Mix flour, oats, salt, baking soda, and sugars together.  Mix in melted butter and vanilla.
  3. Press half of the crumb mixture into prepared pan; bake for 15 minutes.
  4. While that bakes, prepare filling by beating eggs in a large bowl and then adding sugar, cinnamon, salt, ginger, and cloves.  Mix well and then stir in pumpkin; add evaporated milk and mix thoroughly.
  5. Pour filling over partially baked crust and bake for 15 minutes.
  6. Remove from oven and crumble the rest of the crumb mixture over the top.  Return to the oven and bake an additional 25-35 minutes, until the top is nicely browned and center is set..
  7. Cool at least 1 hour at room temperature and an additional hour in the refrigerator before serving.  Cut and serve with whipped cream, if desired.

I was planning to follow Erin's recipe and make this in a 13x9" pan, but I ended up with my 4 glass 13x9"  pans full - 2 with turkey and 2 with rolls - so I had to come up with an alternative plan.  I cut the crust recipe in half and just used my regular pumpkin pie filling recipe - the recipe from the Libby's pumpkin can, but you can use your favorite pumpkin pie filling recipe.  I think it turned out great.


The crust and crumb layer on top are amazingly good.  The crunch, texture and flavor are absolutely perfect.  Once the dessert has been covered and refrigerated, it loses a bit of the original crunch - why do things have to do that? - but it's still really, really good.  I'd say this is an excellent alternative to pumpkin pie.  The crumb layers kick it up a notch, it can more easily be cut into smaller pieces and serve more people, and it's easy to make.  If you think you can't make a pie crust, this recipe is definitely one you should try.  I'm not sure I'll ever stop making pumpkin pie for Thanksgiving, but I'm definitely thinking I'll be replacing one of the pies I usually make with a pan of these Pumpkin Pie Crumb Bars from now on.
 

I hope you all had a great Thanksgiving filled with people you love and had some yummy treats of your own!


Wednesday, November 25, 2015

Roasted Veggies and Sausage

A few weeks ago I was checking out at the grocery store. I was buying smoked sausage, red potatoes, and cabbage. There were a few other things too, but there was something about seeing those things on the belt that made me think I really needed to throw something together with them.  I went looking for inspiration, and this recipe from real life Dinner was pretty much exactly what I had in mind.  Except I changed the vegetables a bit.  That, of course, is the beauty of a recipe like this - you can use the vegetables you have on hand or the vegetables that are telling you they really want to be thrown together into something yummy.  I think any number of combinations would work.


Roasted Veggies and Sausage
adapted from real life Dinner

Ingredients:
  • 1 large onion, cut into chunks
  • 3-4 cloves garlic, chopped
  • 3-4 large carrots, sliced
  • 4-5 medium red potatoes, diced
  • Coarsely sliced cabbage (I did not measure)
  • 3-4 T olive oil
  • Salt and pepper to taste (I used 1 tsp. salt and freshly ground pepper)
  • 1 12-16 ounce package smoke sausage or kielbasa, sliced into 1-inch pieces
Directions:
  1. Preheat oven to 425° F.
  2. Toss veggies with olive oil and salt & pepper in 13x9" pan.  Top with sliced sausage.
  3. Bake for about an hour, stirring every 20 minutes or so.

That's it.  Really simple and really tasty.  Just chop your veggies up, toss them together, bake, and enjoy!


The secret is to cut all the veggies into similar sized pieces so they will cook evenly.  Next time I think I am going to cut my carrots and potatoes just a bit smaller.  Also, the size of your veggies, and how well roasted you like them, will determine how long you'll need to bake this.


This heats up really well, and the leftovers might be even better than the first time.  we had some green beans with it the first night, and I just threw them into the pan and roasted them with the rest.  (see them in the back there?)  Just really so good.

Monday, November 23, 2015

Free Apples!

This isn't exactly how it happened, but I have been using a lot of apples lately, and they have come off my neighbors' tree, so it made me laugh.


Our neighbors have an apple tree, but they don't want to bother with the apples, so they just let them fall.  The local wildlife really appreciates it.  They (the neighbors, not the wildlife) say we can have any apples we want.  I picked a few, but most of them are out of my reach.  Our neighbor has a handy apple picker he's let me use in the past, but this year he never got it out of the shed, and I never caught him outside or thought about it when I saw him, so I didn't have it to use.  However, in the past few weeks we've had some windy weather that knocked several of those apples onto the ground, so I went over and picked a bunch of them up while they were fairly easy to tell from the ones that had been on the ground for a while and while they were still in pretty good shape.

I've been making apple desserts and applesauce and drying lots of apples, too.  If you've got any other good ideas for apples, please let me know, because I still have quite a few apples left.

Sunday, November 22, 2015

Apple Dumplings

My mom used to make these, but I hadn't thought of them in ages, until someone recently posted a recipe for Apple Dumplings.  Their recipe wasn't quite the same thing, but it reminded me, so I asked mom to share the recipe.  First she had to find it, because it doesn't sound like she'd made them in a while.


Once I got the recipe, it took me a while to actually make it, but I finally made some of these last week.   Yep, they're just as good as I remember.  Tender apples rolled in crust and swimming in cinnamon sugar syrup.  What's not to love?

Apple Dumplings 

Ingredients:
  • 8 to 10 apples, sliced (about 8 cups)
  • 1 cup sugar
  • 1/2 tsp. cinnamon
  • 2 cups flour
  • 2 tsp. baking powder
  • 1/2 tsp. salt
  • 1-1/2 sticks butter
  • 1/2 cup milk
  • for syrup:
    * 1-1/2 cups sugar
    * 1/2 tsp. cinnamon
    * 1/4 tsp. nutmeg
    * 1/2 stick butter
    * 2-1/2 cups boiling water
Directions:
  1. Mix sliced apples with sugar and cinnamon; set aside.
  2. For dough, mix as for pie crust - combine flour, baking powder, and salt in food processor; cut butter into smaller chunks and add to food processor; pulse until mixture resembles coarse meal; add milk and pulse just until dough clumps together.  Do not over-mix. (can also be mixed by hand, but the food processor makes it so much easier)
  3. On floured counter, divide dough into two pieces and roll each piece into a rectangle the thickness of a pie crust. Spread apples on dough and roll up, starting from the wide end.  Slice each roll into 10 slices and place in 13x9" pan.
  4. Pour syrup over top and bake 15 minutes @375° F, then reduce heat to 350° F and bake an additional 45-55 minutes, until nicely browned. 
Serve warm with vanilla ice cream.


    Optionally for the syrup - there will most likely be liquid left in the bottom of your apple bowl, so use that.  It already has sugar in it, so you can reduce the sugar to 1 cup and also reduce your boiling water so the total liquid equals 2-1/2 cups.


    While this is really good just the way it is, I am thinking of adding some lemon juice and lemon zest to the syrup next time I make it.  Not a lot, just enough to add a little touch of sharpness or zing.


    Serve warm, with vanilla ice cream and some of the syrup drizzled on top.  Yum!


    I'm pretty sure I need to make this more often!

    Sunday, November 15, 2015

    Crock Pot Applesauce

    This applesauce is so much better than anything you can buy in the store, and it's really simple to make.  Definitely a win-win.


    Crock Pot Applesauce
    adapted from a recipe on food.com

    Ingredients:
    • 4 lbs. tart apples (about 12 cups), cored, peeled, and sliced
    • 1⁄2 cup sugar
    • 1⁄2 teaspoon cinnamon
    • 3/4 cup apple juice or water
    • juice of half a lemon
    • 1/2 tsp. vanilla
    Directions:
    1. Mix apples with cinnamon and sugar in 5-quart crock pot.
    2. Pour juice or water, lemon juice, and vanilla over apples. Cook on low for 6-8 hours (or overnight) or high for 3-4 hours.  
    3. Optional: stir occasionally (if cooking on high), and crack the lid slightly to allow some of the liquid to cook off in the last hour.

    I incorporated a few of the suggestions some of the reviewers mentioned - using apple juice instead of the water, and adding some vanilla.  I thought it turned out really good.  Another reviewer suggested adding more cinnamon, but I stuck with the original 1/2 tsp. because I used another recipe for crock pot applesauce several years ago, and it was really cinnamony.  I figured I'd rather have the flavor of the apples shine through.

    The recipe calls for about 12 cups of sliced apples.  I ended up adding another cup or two because my crock pot was so close to being full I figured I might as well fill it the rest of the way. 

    I cooked mine on high, and stirred it occasionally, about once every hour.  I also cooked it probably 4 hours and then let it cook another hour with the lid slightly cracked to let some of the liquid cook off.  Cooking times can vary depending on the type of apples you use.  I'm not sure what kind of apples I used because I got them off my neighbors' tree.  All I know is that they're fairly tart and they hold together pretty well when cooked.  That's great for apple pie, but it does take a bit more cooking (and stirring) for applesauce.  The good part about cooking the apples in the crock pot is that it doesn't really matter.  You can cook them as long as you want, and you don't need to keep a close eye on the pot.


    We're really enjoying this.  It's great when it's fresh and warm straight out of the crock pot, and it's good cold, too.  Definitely give it a try.

    Friday, November 6, 2015

    10 Grain Muffins with Apples & Cinnamon

    I've been using either a 7 Grain or a 10 Grain cereal in my Whole Grain Sourdough bread for ages now.  That's pretty much why I've started calling it whole grain instead of whole wheat - never mind that the recipe still says whole wheat.  On the Bob's Red Mill 10 Grain Cereal package there's a recipe for muffins.  For some reason I've never made those muffins, but I was reminded of the recipe when I bought a new package this week.  Usually I keep my cereal in a peanut butter jar, so I don't see the recipe unless I happen to buy a new package, and it usually lasts me quite a while because I use about 2 T each time I make bread.


    This time I decided to make the muffins, but of course I changed them up a bit.  I've got lots of apples right now, so I decided to add some diced apples.  And some cinnamon.


    10 Grain Muffins w/ Apples & Cinnamon
    adapted from Bob's Red Mill

    Ingredients:
    • 1-1/4 cups buttermilk
    • 1 cup 10-grain cereal
    • 1/3 cup butter, softened
    • 1/2 cup brown sugar
    • 1 egg
    • 1 cup chopped apples
    • 1 cup flour
    • 1 tsp. baking soda
    • 1 tsp. baking powder
    • 1 tsp. salt
    • 1/2 tsp. cinnamon
    Directions:
    1. Preheat oven to 400°
    2. Combine milk and cereal; let stand for 10 minutes.
    3. Cream sugar and butter together.  Add egg and mix well. Stir in chopped apples, then mix in milk and cereal mixture.
    4. Combine dry ingredients and stir in; just until mixed.
    5. Pour into greased muffin tin and bake for 20-25 minutes, until a toothpick inserted in the center of a muffin comes out clean and muffins are browned to your liking.  Remove from oven and allow to cool for 5 minutes before removing from pan.


    I am really enjoying these muffins, especially with a little butter and a drizzle of honey.  I think my favorite apple muffins are still these Oatmeal Apple Muffins (seriously, try those; they are awesome), but I am enjoying these for a change.  They're nice and moist, and the 10 Grain Cereal adds a nice texture and a slight chewiness.  I am thinking that I'll at least double the cinnamon next time, because I can't really taste it in these.  For now sprinkling a little cinnamon on top of the honey really does the trick.  So good!  

    I also think either all whole wheat flour or at least half would be good.  I just used the unbleached white flour the recipe called for because I figured all the grains in the cereal would be enough, but I'm a sucker for whole wheat flour in my muffins, so I'm trying that next time.

    Now I'm going to check out all the other recipes on the Bob's Red Mill site and see what else I've been missing out on.


    Sunday, November 1, 2015

    Chicken with Balsamic Mushroom Sauce

    It's time again for Secret Recipe Club reveal!  My secret blog assignment this month was Baking & Creating with Avril.  I love that her recipes are "Nothing too fancy but always made with love and happiness!"  A few of the recipes that caught my eye were her Pumpkies, Rustic Tomato Tart, and Skillet Granola. They all sound great, and the pictures that go along with Avril's recipes are mouth watering.  I finally decided that this Chicken with Balsamic Mushroom Sauce just really had to be made.


    Chicken with Balsamic Mushroom Sauce
    from baking & creating with Avril

    Ingredients:
    • 8 oz. pasta (I used Penne)
    • 1 lb. boneless skinless chicken breasts
    • 2 Tbsp flour
    • 1/4 tsp salt
    • 2 tsp oil
    • 8 oz. mushrooms, sliced
    • 1/2 cup finely diced onion
    • 1 cup chicken broth
    • 2 cloves of garlic, minced
    • 2 Tbsp balsamic vinegar
    • 1/2 tsp dried thyme
    • 2 Tbsp butter
    • Parmesan cheese to sprinkle on top
    Directions:
    1. Cook pasta according to package directions.
    2. While pasta cooks, slice chicken breast into strips.  Mix flour and salt and add chicken slices; toss to coat.
    3. Heat oil in a large skillet over medium-high heat . Add coated chicken and cook until it begins to brown and meat is no longer pink in center.  Add mushrooms, diced onion and garlic and saute for 4 minutes or until lightly browned.
    4.  Add broth, balsamic vinegar and thyme; bring to a boil and then reduce heat and simmer for 4 minutes to thicken slightly and blend the flavors together.  Stir in butter until melted.
    5.  Add a ladle of pasta water to the chicken and sauce; reserve additional pasta water before draining (add to leftovers, if there are any).  Stir drained pasta into skillet and stir to coat; simmer for a few minutes to bring it all together; add additional pasta water if necessary.  Serve with Parmesan cheese and fresh ground black pepper to sprinkle on top.

    Avril's recipe involved a few more steps, but I like simple, so I just cooked everything together in one skillet.  (except the pasta)  It turned out really good.  My husband and I both really liked it.  He even ranked it up alongside his favorite pasta dish from The Olive Garden - just with chicken.  I'd say that is high praise.


    Any leftovers heat up really well, and this is just as good, if not better, the second time.  You'll want to add some reserved pasta water to your leftovers to keep the pasta from soaking up all the moisture in the sauce.


    Thursday, October 22, 2015

    Chard and White Bean Stew

    I'm still getting a few things from my garden.  The tomatoes are ripening, and I've been picking a few every couple days.  There are plenty of green ones still needing to ripen.  There are also quite a few small jalapenos on the plants and some bell peppers, too.  We had to cover the tomato and pepper plants for a few nights this weekend to protect them from frost, but it's warmed up again so we should be good for a while.  I've also got carrots and chard still out in the garden.  I read somewhere that carrots will taste better after a couple of good freezes, so though I've pulled several of the carrots, I'm going to leave the rest of them for a while.  Chard can survive a frost, so I should be having that for a while, too.


    With all the chard and tomatoes, I started searching for a recipe that would use some of them.  There are quite a few good sounding recipes, but this one won out.  She served this with crusty bread, and a poached egg on top, but I skipped the poached egg.  It does look interesting, though.  Perhaps next time?

    Chard and White Bean Stew
    Adapted from Smitten Kitchen

    Ingredients:
    • 1 cup chopped carrots
    • 1 cup chopped celery
    • 1 cup chopped onion
    • 2 garlic cloves, finely chopped
    • 1 pound Swiss chard (or another green), stems removed and coarsely chopped
    • 3 tablespoons olive oil
    • 1 cup dry white wine (or juice of half a lemon and water to make 1 cup)
    • 2 15-ounce cans (or about 4 cups) white beans, drained and rinsed
    • 1 cup chicken broth (or 2 cups broth and not bean liquid)
    • 1 cup bean liquid (if using home cooked beans)
    • 1-2 cups pureed tomatoes
    • 1/2 tsp. salt
    • 1/4 tsp. black pepper
    • 1/4 tsp. dried thyme
    • 1 bay leaf
    Directions:
    1. Prepare vegetables.  Heat olive oil in 5 to 6 quart pot over medium heat. Add carrots, celery, onion and garlic and saute for 15 minutes or until onion begins to brown. Add chard and cook, stirring, until chard begins to wilt. 
    2. Add wine (or lemon water), scraping up any bits that have stuck to the pot and cook until it has reduced by three-fourths. Add beans, broth, tomatoes, salt, black pepper, thyme and bay leaf and bring to a boil. Reduce heat to medium-low, cover and simmer for 20 minutes. 
    3. Add more broth if you’d like a thinner stew and adjust salt and pepper to taste.  Serve with crusty bread.  Drizzle with Balsamic vinegar if desired.

    I really enjoyed the flavors in this. My husband didn't drizzle any of the vinegar on his, but I thought that really added a nice touch.  I really love when the broth soaks into the bread.  So good!


    This whole grain sourdough is the perfect complement to so many things!  I used 1 cup of the bean liquid in this batch, instead of the water.

    Friday, October 16, 2015

    Peggy's Original Veggie Kablooie!!!

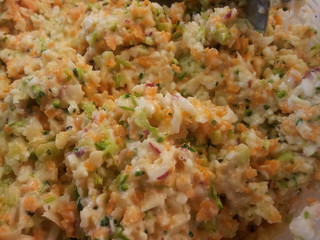
    Veggie KablooieMy friend Peggy has been making this incredibly tasty and addicting stuff we call Veggie Kablooie for a while now.  It's always a big hit at potlucks, and everyone looks forward to it.  She posted the recipe a while back, and I meant to share then, but somehow I just never got around to it.  I even made my own batch of Veggie Kablooie from the recipe.  It was good, but not as good as Peggy's.  (Now you know, Peggy)

    Then last night Peggy posted something on Facebook asking if she should make Veggie Kablooie for the Barn Party this weekend, and I was reminded that I never posted this.  I don't get to go to the Barn Party - since it's in Wisconsin, and I'm in Indiana - so I won't get to have any Veggie Kablooie, but I can finally get around to sharing the recipe.  Seriously, you have to try this stuff.  So good!

    Posted by permission:


    Veggie Kablooie ingredientsThis recipe evolved over a year or so until it became what it is. It's something that is welcomed with open arms (hands and mouths!) whenever I bring it to a party.

    What is it??? It's good for you! Well, it must be since it is filled with vegetables! It's a snacker's delight!  It's vegetables that went.....
    Kablooie!!!!!

    Many of my friends have asked me for my recipe and I have given them a print out from my computer. No one has ever gotten back to me to say they made it and it's just as good as mine... or even told me they made it. So I can't say this recipe has been tested by anyone but myself, and I actually never really measure anything when I make this. I just kinda go by what looks right.
     

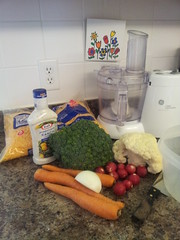
    This is what you need for Peggy's Original Veggie Kablooie:

    • A food processor
    • 2 parts broccoli
    • 2 parts cauliflower
    • 2 parts carrot
    • 1 part radish, the ones with the greens on top are the best.
    • 1 part onion--yellow, white, or, for color use the purple ones
    • 1 part green pepper (optional- I think it adds a brightness to the Kablooie)
    • 1 part shredded mild cheddar cheese
    • enough Kraft Peppercorn Ranch dressing to moisten
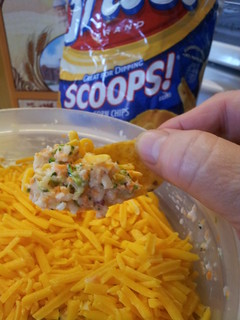
    • 1 or more bags of Fritos Scoops (not pictured here)
    Veggie KablooieDirections:

    Take all the veggies and grind them up, add enough dressing to moisten, add the cheese no more than 4 hours before serving. Eat with Fritos Scoops (best), or other chips or coin shaped carrots. or scoop-cut bell peppers or other scooplike things.. NOT celery! You will ruin it with celery!

    You can also stuff pita pockets, or eat it like coleslaw!


    For a complete picture tutorial, visit What!!!! You've NEVER heard of Veggie Kablooie?????

    Saturday, September 19, 2015

    Sweet Chili Chicken Pizza

    I've made this pizza several times now.  It's really good and simple to make.  I've never had Papa Murphy's Thai Chicken Delite pizza, so I can't say for sure it's the same.  But it was the inspiration.


    Sweet Chili Chicken Pizza

    Ingredients:
    • pizza dough 
    • sweet chili sauce
    • grilled chicken
    • chopped onions
    • sliced green onions
    • thinly sliced zucchini
    • Mozzarella cheese
    • Cheddar cheese 
    Directions:
    1. Roll/press pizza dough out to form crust for one pizza; prick with fork and bake at 450° for 5-7 minutes..
    2. Remove crust from oven.  Spread sauce over crust and top with toppings.  Sprinkle with crushed red chili flakes if desired.
    3. Bake for an additional 10-15 minutes or until crust is browned and cheese melted.
    4. Remove from oven and cool for 5 minutes before cutting.  Top with sliced fresh basil if desired.

    I have no measurements because it's pizza, and you just put toppings on until it looks right to you. There's no right or wrong way.  I do think it's better if you slice the zucchini really thin, but it's OK if you don't too.  I seasoned my chicken with a little salt, pepper, and ground ginger when I grilled it (in my George Foreman), which was pretty good on this pizza, too.


    Now I just need to make some more of that sweet chili sauce.

    Sunday, September 6, 2015

    Buffalo Chicken Rolls

    It's time again for Secret Recipe Club reveal!  My secret blog assignment this month was Sarah's blog Things I Make (for Dinner), where she shares her love of cooking and the recipes she's been trying.  Sarah likes cooking challenges that take her outside her comfort zone, but she's also big on comfort food.  She and her husband love the health benefits and money saved from cooking and eating at home.  I'm with them all the way on that one!

    A couple recipes that caught my eye were the Spinach Stuffed Flank Steak and this Mile High Vegetable Pie. Now that my tomatoes are starting to ripen, I am definitely going to have to try that one!

    But, when I saw the recipe for Buffalo Chicken Cupcakes, I just had to try it.  Cupcakes? Sarah baked these in a muffin tin, which is where the 'cupcakes' come in.  I ended up baking mine on a baking sheet because I was afraid they'd be too big for the muffin tins, so I'm just calling them Buffalo Chicken Rolls.  It doesn't sound as fun, but I'm pretty sure they are just as yummy!


    Buffalo Chicken Rolls
    from Things I Make (for Dinner)

    Ingredients:
    • Pizza dough for one pizza
    • 1 lb boneless chicken breast (or thighs) cooked and shredded
    • 1 T butter
    • 1 onion, finely chopped
    • 2 cloves garlic, minced
    • 1/2 c Buffalo wing sauce (such as Frank's)
    • 2 c shredded cheese
    Directions:
    1. Melt butter in medium skillet.  Add onion and garlic, and saute until soft.  Stir in chicken and sauce; remove from heat.
    2. Divide the pizza dough into 2 pieces. Roll each piece into a rectangle about 1/4" thick. Spread each rectangle with half of the chicken mixture and sprinkle evenly with cheese. Starting with one long edge, roll up, pinching to seal the seam.
    3. Cut each roll into 8 pieces and place, cut side down, onto well greased baking sheet. (or use parchment paper or silicon baking mat) Bake at 400° F for 15-18 minutes, until cheese is melted and crust is golden.

    Ready to roll
    I used a Frank's RedHot Kickin' BBQ sauce instead of the traditional Buffalo wing sauce, and it turned out really good.  I'm thinking this would be good with about any sauce you like.

    Ready for the oven
    Next time I think I'll bake them either in a 13x9" pan so the edges will touch and they'll hold their shape better.  Some of mine kind of fell apart - though that had no effect on the taste. Or I'm going to try the muffin tins so I'll have 'cupcakes' of my own.  However I bake them, I'll definitely make these again!  They are yummy.


    Thursday, August 20, 2015

    Mushroom Florentine Pasta

    We had this for dinner recently. Yum!  Seriously, all these flavors are so good together.  There's just something about mushrooms and spinach, and creamy pasta sauce.


    Mushroom Florentine Pasta
    from she wears many hats

    Ingredients:
    • 8 ounces linguine pasta (or equal amount of another pasta)
    • 3 T flour
    • 1 cup chicken broth
    • 1 cup milk
    • ½ teaspoon salt
    • ½ teaspoon black pepper
    • 3 T olive oil
    • 8 ounces sliced mushrooms
    • 2 garlic cloves, minced
    • 3 ounces smoked Gouda cheese, shredded (if you don't have smoke Gouda, plain will be fine, or use Gruyere)
    • 4 cups (or more) spinach leaves
    Directions:
    1. Begin cooking pasta according to package instructions.
    2. Whisk together flour, chicken broth, milk, salt and pepper. Set aside.
    3. In a large skillet, heat olive oil over medium-high heat. Add sliced mushrooms and sauté for 6 minutes. Add minced garlic and sauté for 2 more minutes, until garlic just begins to brown.
    4. Whisk flour, chicken broth, milk, salt and pepper mixture into mushrooms and garlic. Bring to a simmer and cook, stirring occasionally, until thickened, about 3-4 minutes.
    5. Add shredded cheese and stir until cheese has melted.
    6. Mix in spinach; stir and cook until wilted.
    7. Add a ladle or two of pasta water to skillet, then drain pasta and add to skillet; toss to coat.

    We had some grilled chicken with this and topped it with some fresh ground pepper. It was absolutely perfect. I will definitely be making this again.


    Wednesday, August 12, 2015

    Sweet Chili Sauce

    The dressing for the Sesame Peanut Noodle Salad I made recently called for sweet chili sauce.  I didn't have any sweet chili sauce and wasn't sure I wanted to buy a whole jar of it.  So, I went looking for a recipe to make some myself.  I found a recipe on food.com - which I cannot find now.  I removed the link from my Sesame Peanut Noodles recipe, because I was going to post the chili sauce recipe separately.  And then I forgot to actually start this post and save the link here.


    I have searched food.com repeatedly, and there are lots of sweet chili sauce recipes, but I just can't find this one.

    Sweet Chili Sauce
    adapted from a recipe on food.com

    Ingredients:
    • 1 8-oz. can tomato sauce
    • 1/4 cup brown sugar
    • 2 T cider vinegar
    • 1/2 tsp. red chili flakes
    • 1/4 tsp. cinnamon
    • dash cloves
    • dash allspice
    • dash salt
    Directions:
    1. In small saucepan, mix all ingredients.
    2. Simmer over low heat until thickened.
    3. Store in glass jar in refrigerator.

    The original recipe did not call for any chili flakes - which seemed weird since it's called sweet chili sauce - so I added some.  Since I've never actually had sweet chili sauce, I'm not sure if this tastes like the kind you'd buy in the store or not, but it is a nice flavorful sauce, and it worked really well in my noodle salad - both times I made it. (so far)
    Now, what else can I use this sauce for?  Because, even though I did not buy a whole jar just to make the Sesame Peanut Noodles, I do have quite a bit of yummy sauce. 
    I recently saw an ad for Papa Murphy's Thai Chicken Pizza that I'm going to try making real soon - even though I haven't tried the 'real' thing yet.  I'm not sure what else.  Any ideas?

    Sunday, August 2, 2015

    Sesame Peanut Noodles

    It's time again for Secret Recipe Club reveal!  My secret blog assignment this month was Trisha's blog My Hobbie Lobbie. Trisha loves to bake, and she's married to her best friend - we have that in common.  She's also into crafting and crocheting, and uses her blog to keep track of recipes and crochet patterns.  I never did learn to crochet, but I am amazed by people who can.

    I started scrolling through Trisha's list of recipes and found a bunch I'd like to try - and I hadn't even made it down to the baked goods.  Here are just a few that sounded yummy:


    Trisha lives in Australia, where it's winter right now, so she's making soups and trying to stay warm.  I may have to go back and look at some of her soups when winter comes to our part of the world, but for now I thought something cool would be better.  Or something to use the produce that's coming out of the garden; I'm getting lots of jalapenos and zucchini.
     
    I ended up choosing this Sesame Peanut Noodle Salad because it's both - cool, and it uses lots of veggies. As Trisha said - "You can pretty much alter this salad to accommodate the salad veggies that you have at hand."  Perfect!  The recipe reflects the veggies I used this time, but pretty much any combination or amount would work.

    Sesame Peanut Noodles
    adapted from My Hobbie Lobbie

     Ingredients:
    • 8 oz. angel hair pasta
    • a handful of bean sprouts (I forgot to put these in)
    • 2 green onions, sliced
    • 1/2 green pepper, thinly sliced
    • 1 large carrot, cut into matchsticks
    • 1/2 cup shredded cabbage (or more)
    • 2 T chopped cilantro
    • 1 T sesame seeds
    for the dressing:
    • 1 clove garlic, crushed
    • 1 T sesame oil
    • 1 T olive oil
    • 1 T soy sauce
    • 2 T lime juice
    • 2 T sweet chili sauce
    • 3 T peanut butter 
    Directions:
    1. Break pasta in half and cook according to package directions; drain and rinse with cold water.
    2. Toss pasta and remaining salad ingredients together in a large bowl.
    3. Mix dressing; add to salad and toss well, making sure everything is coated.
    4. Serve with additional cilantro and sesame seeds to garnish.  Refrigerate leftovers.

     My husband and I had this salad for lunch one day last week, and we both really enjoyed it.  The dressing has a really good flavor, and the combination of soft pasta and crunchy vegetables is excellent.  I will definitely be making this again.  I'm thinking some zucchini would be a nice addition...


      © Blogger template 'Totally Lost' by Ourblogtemplates.com 2008 - Header credit: Steve Wampler

    Back to TOP