bcmom's kitchen

bcmom's kitchen

Sunday, November 15, 2015

Crock Pot Applesauce

This applesauce is so much better than anything you can buy in the store, and it's really simple to make.  Definitely a win-win.


Crock Pot Applesauce
adapted from a recipe on food.com

Ingredients:
  • 4 lbs. tart apples (about 12 cups), cored, peeled, and sliced
  • 1⁄2 cup sugar
  • 1⁄2 teaspoon cinnamon
  • 3/4 cup apple juice or water
  • juice of half a lemon
  • 1/2 tsp. vanilla
Directions:
  1. Mix apples with cinnamon and sugar in 5-quart crock pot.
  2. Pour juice or water, lemon juice, and vanilla over apples. Cook on low for 6-8 hours (or overnight) or high for 3-4 hours.  
  3. Optional: stir occasionally (if cooking on high), and crack the lid slightly to allow some of the liquid to cook off in the last hour.

I incorporated a few of the suggestions some of the reviewers mentioned - using apple juice instead of the water, and adding some vanilla.  I thought it turned out really good.  Another reviewer suggested adding more cinnamon, but I stuck with the original 1/2 tsp. because I used another recipe for crock pot applesauce several years ago, and it was really cinnamony.  I figured I'd rather have the flavor of the apples shine through.

The recipe calls for about 12 cups of sliced apples.  I ended up adding another cup or two because my crock pot was so close to being full I figured I might as well fill it the rest of the way. 

I cooked mine on high, and stirred it occasionally, about once every hour.  I also cooked it probably 4 hours and then let it cook another hour with the lid slightly cracked to let some of the liquid cook off.  Cooking times can vary depending on the type of apples you use.  I'm not sure what kind of apples I used because I got them off my neighbors' tree.  All I know is that they're fairly tart and they hold together pretty well when cooked.  That's great for apple pie, but it does take a bit more cooking (and stirring) for applesauce.  The good part about cooking the apples in the crock pot is that it doesn't really matter.  You can cook them as long as you want, and you don't need to keep a close eye on the pot.


We're really enjoying this.  It's great when it's fresh and warm straight out of the crock pot, and it's good cold, too.  Definitely give it a try.

Friday, November 6, 2015

10 Grain Muffins with Apples & Cinnamon

I've been using either a 7 Grain or a 10 Grain cereal in my Whole Grain Sourdough bread for ages now.  That's pretty much why I've started calling it whole grain instead of whole wheat - never mind that the recipe still says whole wheat.  On the Bob's Red Mill 10 Grain Cereal package there's a recipe for muffins.  For some reason I've never made those muffins, but I was reminded of the recipe when I bought a new package this week.  Usually I keep my cereal in a peanut butter jar, so I don't see the recipe unless I happen to buy a new package, and it usually lasts me quite a while because I use about 2 T each time I make bread.


This time I decided to make the muffins, but of course I changed them up a bit.  I've got lots of apples right now, so I decided to add some diced apples.  And some cinnamon.


10 Grain Muffins w/ Apples & Cinnamon
adapted from Bob's Red Mill

Ingredients:
  • 1-1/4 cups buttermilk
  • 1 cup 10-grain cereal
  • 1/3 cup butter, softened
  • 1/2 cup brown sugar
  • 1 egg
  • 1 cup chopped apples
  • 1 cup flour
  • 1 tsp. baking soda
  • 1 tsp. baking powder
  • 1 tsp. salt
  • 1/2 tsp. cinnamon
Directions:
  1. Preheat oven to 400°
  2. Combine milk and cereal; let stand for 10 minutes.
  3. Cream sugar and butter together.  Add egg and mix well. Stir in chopped apples, then mix in milk and cereal mixture.
  4. Combine dry ingredients and stir in; just until mixed.
  5. Pour into greased muffin tin and bake for 20-25 minutes, until a toothpick inserted in the center of a muffin comes out clean and muffins are browned to your liking.  Remove from oven and allow to cool for 5 minutes before removing from pan.


I am really enjoying these muffins, especially with a little butter and a drizzle of honey.  I think my favorite apple muffins are still these Oatmeal Apple Muffins (seriously, try those; they are awesome), but I am enjoying these for a change.  They're nice and moist, and the 10 Grain Cereal adds a nice texture and a slight chewiness.  I am thinking that I'll at least double the cinnamon next time, because I can't really taste it in these.  For now sprinkling a little cinnamon on top of the honey really does the trick.  So good!  

I also think either all whole wheat flour or at least half would be good.  I just used the unbleached white flour the recipe called for because I figured all the grains in the cereal would be enough, but I'm a sucker for whole wheat flour in my muffins, so I'm trying that next time.

Now I'm going to check out all the other recipes on the Bob's Red Mill site and see what else I've been missing out on.


Sunday, November 1, 2015

Chicken with Balsamic Mushroom Sauce

It's time again for Secret Recipe Club reveal!  My secret blog assignment this month was Baking & Creating with Avril.  I love that her recipes are "Nothing too fancy but always made with love and happiness!"  A few of the recipes that caught my eye were her Pumpkies, Rustic Tomato Tart, and Skillet Granola. They all sound great, and the pictures that go along with Avril's recipes are mouth watering.  I finally decided that this Chicken with Balsamic Mushroom Sauce just really had to be made.


Chicken with Balsamic Mushroom Sauce
from baking & creating with Avril

Ingredients:
  • 8 oz. pasta (I used Penne)
  • 1 lb. boneless skinless chicken breasts
  • 2 Tbsp flour
  • 1/4 tsp salt
  • 2 tsp oil
  • 8 oz. mushrooms, sliced
  • 1/2 cup finely diced onion
  • 1 cup chicken broth
  • 2 cloves of garlic, minced
  • 2 Tbsp balsamic vinegar
  • 1/2 tsp dried thyme
  • 2 Tbsp butter
  • Parmesan cheese to sprinkle on top
Directions:
  1. Cook pasta according to package directions.
  2. While pasta cooks, slice chicken breast into strips.  Mix flour and salt and add chicken slices; toss to coat.
  3. Heat oil in a large skillet over medium-high heat . Add coated chicken and cook until it begins to brown and meat is no longer pink in center.  Add mushrooms, diced onion and garlic and saute for 4 minutes or until lightly browned.
  4.  Add broth, balsamic vinegar and thyme; bring to a boil and then reduce heat and simmer for 4 minutes to thicken slightly and blend the flavors together.  Stir in butter until melted.
  5.  Add a ladle of pasta water to the chicken and sauce; reserve additional pasta water before draining (add to leftovers, if there are any).  Stir drained pasta into skillet and stir to coat; simmer for a few minutes to bring it all together; add additional pasta water if necessary.  Serve with Parmesan cheese and fresh ground black pepper to sprinkle on top.

Avril's recipe involved a few more steps, but I like simple, so I just cooked everything together in one skillet.  (except the pasta)  It turned out really good.  My husband and I both really liked it.  He even ranked it up alongside his favorite pasta dish from The Olive Garden - just with chicken.  I'd say that is high praise.


Any leftovers heat up really well, and this is just as good, if not better, the second time.  You'll want to add some reserved pasta water to your leftovers to keep the pasta from soaking up all the moisture in the sauce.


Thursday, October 22, 2015

Chard and White Bean Stew

I'm still getting a few things from my garden.  The tomatoes are ripening, and I've been picking a few every couple days.  There are plenty of green ones still needing to ripen.  There are also quite a few small jalapenos on the plants and some bell peppers, too.  We had to cover the tomato and pepper plants for a few nights this weekend to protect them from frost, but it's warmed up again so we should be good for a while.  I've also got carrots and chard still out in the garden.  I read somewhere that carrots will taste better after a couple of good freezes, so though I've pulled several of the carrots, I'm going to leave the rest of them for a while.  Chard can survive a frost, so I should be having that for a while, too.


With all the chard and tomatoes, I started searching for a recipe that would use some of them.  There are quite a few good sounding recipes, but this one won out.  She served this with crusty bread, and a poached egg on top, but I skipped the poached egg.  It does look interesting, though.  Perhaps next time?

Chard and White Bean Stew
Adapted from Smitten Kitchen

Ingredients:
  • 1 cup chopped carrots
  • 1 cup chopped celery
  • 1 cup chopped onion
  • 2 garlic cloves, finely chopped
  • 1 pound Swiss chard (or another green), stems removed and coarsely chopped
  • 3 tablespoons olive oil
  • 1 cup dry white wine (or juice of half a lemon and water to make 1 cup)
  • 2 15-ounce cans (or about 4 cups) white beans, drained and rinsed
  • 1 cup chicken broth (or 2 cups broth and not bean liquid)
  • 1 cup bean liquid (if using home cooked beans)
  • 1-2 cups pureed tomatoes
  • 1/2 tsp. salt
  • 1/4 tsp. black pepper
  • 1/4 tsp. dried thyme
  • 1 bay leaf
Directions:
  1. Prepare vegetables.  Heat olive oil in 5 to 6 quart pot over medium heat. Add carrots, celery, onion and garlic and saute for 15 minutes or until onion begins to brown. Add chard and cook, stirring, until chard begins to wilt. 
  2. Add wine (or lemon water), scraping up any bits that have stuck to the pot and cook until it has reduced by three-fourths. Add beans, broth, tomatoes, salt, black pepper, thyme and bay leaf and bring to a boil. Reduce heat to medium-low, cover and simmer for 20 minutes. 
  3. Add more broth if you’d like a thinner stew and adjust salt and pepper to taste.  Serve with crusty bread.  Drizzle with Balsamic vinegar if desired.

I really enjoyed the flavors in this. My husband didn't drizzle any of the vinegar on his, but I thought that really added a nice touch.  I really love when the broth soaks into the bread.  So good!


This whole grain sourdough is the perfect complement to so many things!  I used 1 cup of the bean liquid in this batch, instead of the water.

Friday, October 16, 2015

Peggy's Original Veggie Kablooie!!!

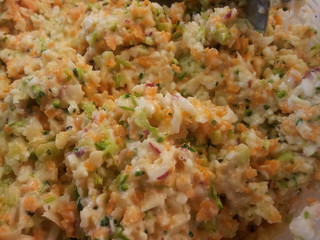
Veggie KablooieMy friend Peggy has been making this incredibly tasty and addicting stuff we call Veggie Kablooie for a while now.  It's always a big hit at potlucks, and everyone looks forward to it.  She posted the recipe a while back, and I meant to share then, but somehow I just never got around to it.  I even made my own batch of Veggie Kablooie from the recipe.  It was good, but not as good as Peggy's.  (Now you know, Peggy)

Then last night Peggy posted something on Facebook asking if she should make Veggie Kablooie for the Barn Party this weekend, and I was reminded that I never posted this.  I don't get to go to the Barn Party - since it's in Wisconsin, and I'm in Indiana - so I won't get to have any Veggie Kablooie, but I can finally get around to sharing the recipe.  Seriously, you have to try this stuff.  So good!

Posted by permission:


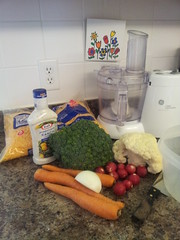
Veggie Kablooie ingredientsThis recipe evolved over a year or so until it became what it is. It's something that is welcomed with open arms (hands and mouths!) whenever I bring it to a party.

What is it??? It's good for you! Well, it must be since it is filled with vegetables! It's a snacker's delight!  It's vegetables that went.....
Kablooie!!!!!

Many of my friends have asked me for my recipe and I have given them a print out from my computer. No one has ever gotten back to me to say they made it and it's just as good as mine... or even told me they made it. So I can't say this recipe has been tested by anyone but myself, and I actually never really measure anything when I make this. I just kinda go by what looks right.
 

This is what you need for Peggy's Original Veggie Kablooie:

  • A food processor
  • 2 parts broccoli
  • 2 parts cauliflower
  • 2 parts carrot
  • 1 part radish, the ones with the greens on top are the best.
  • 1 part onion--yellow, white, or, for color use the purple ones
  • 1 part green pepper (optional- I think it adds a brightness to the Kablooie)
  • 1 part shredded mild cheddar cheese
  • enough Kraft Peppercorn Ranch dressing to moisten
  • 1 or more bags of Fritos Scoops (not pictured here)
Veggie KablooieDirections:

Take all the veggies and grind them up, add enough dressing to moisten, add the cheese no more than 4 hours before serving. Eat with Fritos Scoops (best), or other chips or coin shaped carrots. or scoop-cut bell peppers or other scooplike things.. NOT celery! You will ruin it with celery!

You can also stuff pita pockets, or eat it like coleslaw!


For a complete picture tutorial, visit What!!!! You've NEVER heard of Veggie Kablooie?????

  © Blogger template 'Totally Lost' by Ourblogtemplates.com 2008 - Header credit: Steve Wampler

Back to TOP